 Haplo
Haplo
How to Annotate Images for Object Detection
We labelled real fruit photos in Annot8, our Mac app, turned the export into a YOLO dataset with a short Python script and loaded it in Ultralytics. Here's the method, the three box formats with one real apple written in each, the labelling rules that matter, and how the tools compare.
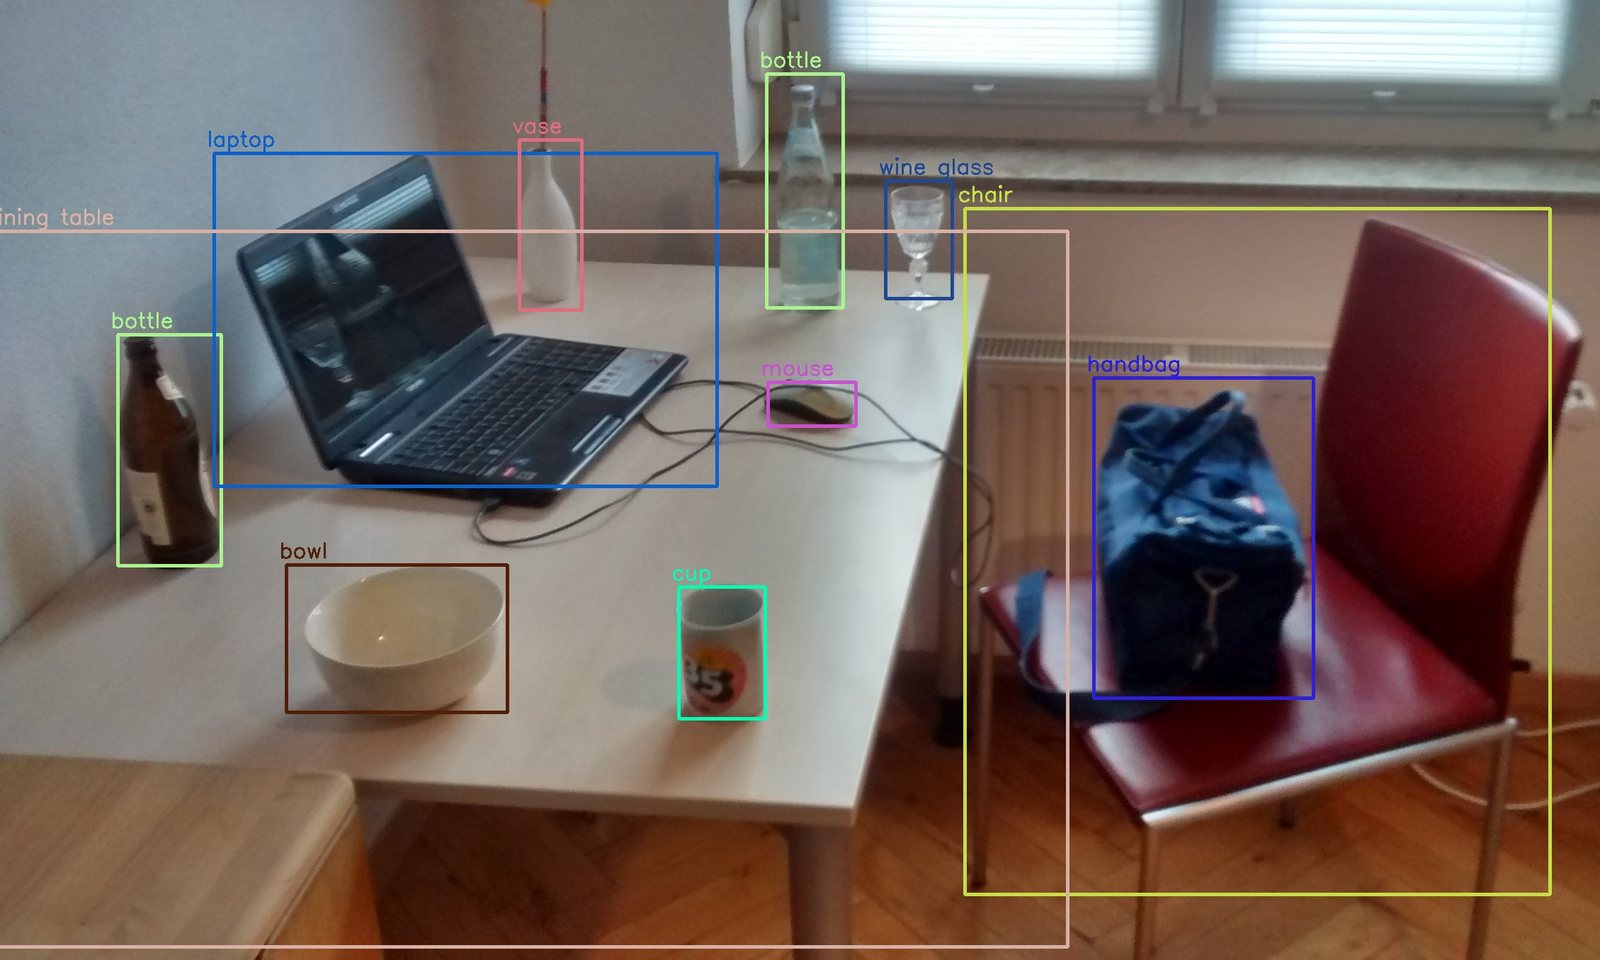
To annotate images for object detection, draw a tight box around every object you want the model to find, give each box a class from a fixed list, and save the boxes in the format your training code reads: YOLO text files, COCO JSON or Pascal VOC XML. Label every instance in every image, include a few images with nothing in them, and hold some images back for validation. We make Annot8, a Mac app for drawing labelled boxes over a folder of images, and used it to label the real fruit photos in this guide.
Below: what annotation is, the three box formats with one real apple written in each, the labelling rules from Ultralytics and the PASCAL VOC guidelines, how to do it in Annot8, a 66-line Python script that turns Annot8’s CSV export into a YOLO dataset (which Ultralytics then loaded with no errors), how many images you need, and how the main annotation tools compare.
What is image annotation for object detection?
It’s marking each object you care about with a class name and a bounding box, so a detector can learn both what the object is and where it is. The PASCAL VOC development kit defines that box as “an axis-aligned rectangle specifying the extent of the object visible in the image”. Image classification needs one label per image; object detection needs a class and a box for every object in it.
Public detection datasets are exactly this, at scale. COCO lists “330K images (>200K labeled)”, “1.5 million object instances” and “80 object categories” on its home page. The PASCAL VOC 2012 development kit counts 11,540 training and validation images with 27,450 objects, leaving out objects marked difficult.
YOLO, COCO and Pascal VOC: the three box formats
All three store the same rectangle. YOLO measures it from the box’s centre as a fraction of the image size, COCO from its top-left corner in pixels, and Pascal VOC as two corners in pixels counted from 1.
| Format | Files | One box | Units |
|---|---|---|---|
| YOLO (Ultralytics) | One .txt per image, one row per object | class x_center y_center width height |
0 to 1: x and width divided by the image width, y and height by its height |
| COCO | JSON: one structure lists every image and every box | "bbox": [x, y, width, height] |
Pixels from the top-left corner of the image, 0-indexed |
| Pascal VOC | One XML file per image | xmin, ymin, xmax, ymax |
Pixels; the top-left pixel is (1, 1) |
- YOLO. Ultralytics’ dataset format page asks for “one *.txt file per image” with “one row per object in class x_center y_center width height format”. Coordinates “must be in normalized xywh format (from 0 to 1)”, and “Class numbers should be zero-indexed (start with 0)”. “If there are no objects in an image, no *.txt file is required.” Ultralytics finds each label file from the image’s path, by replacing “the last ‘images’ directory and the file extension”, so images/train/a.jpg pairs with labels/train/a.txt.
- COCO. The COCO format stores annotations as JSON, with every image and every annotation listed in one structure. Each annotation has an
image_id, acategory_idand"bbox" : [x,y,width,height], where “box coordinates are measured from the top left image corner and are 0-indexed”. Aniscrowdflag marks regions such as “a crowd of people” that are boxed as one group. - Pascal VOC. The VOC development kit stores each box as “[left,top,right,bottom]” and notes that “The top-left pixel in the image has coordinates (1, 1).” Each object can also be flagged truncated, occluded or difficult, and “Objects marked as difficult are currently ignored in the evaluation of the challenge.”
One apple in all three formats
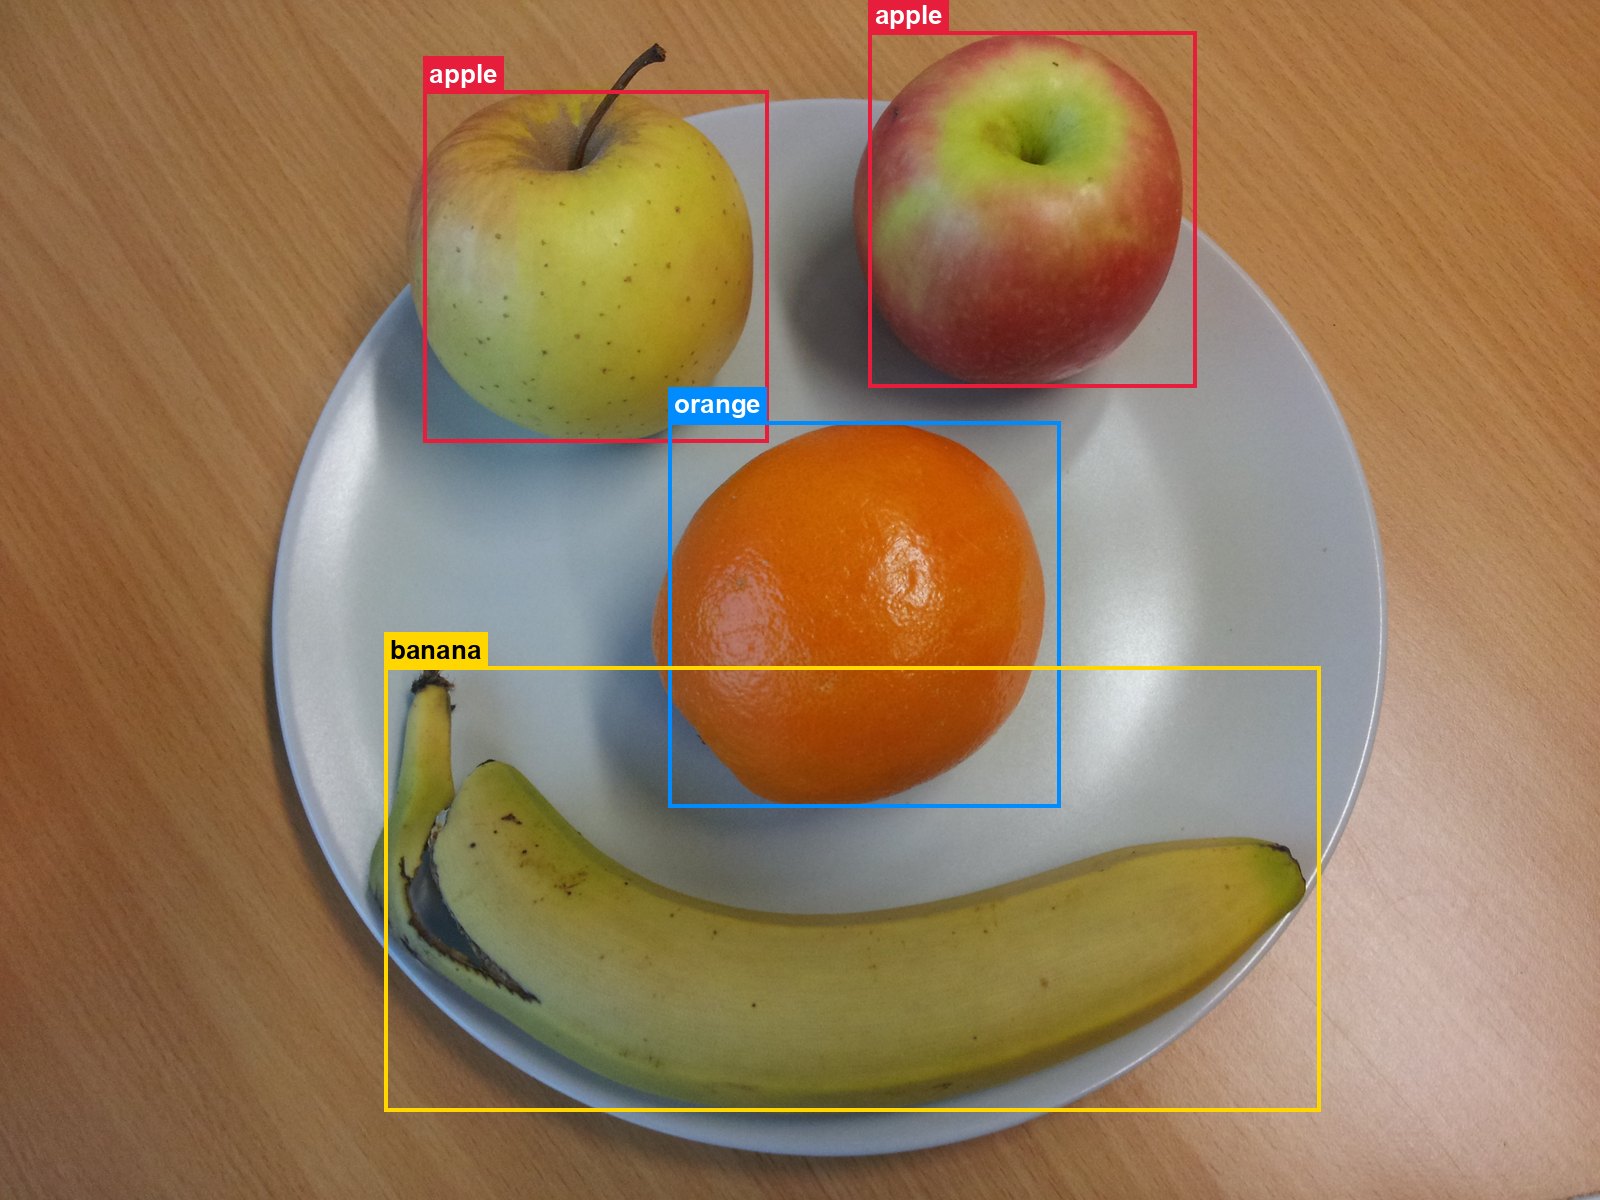
Here is the red apple on our plate photo, which is 3,264 by 2,448 pixels, as Annot8 recorded it and then in each format:
Annot8 CSV   "apple","1772.6363636363635, 64.9090909090909, 669.1818181818181, 724.8181818181818"
COCO         "bbox": [1772.6, 64.9, 669.2, 724.8]
Pascal VOC   <xmin>1774</xmin> <ymin>66</ymin> <xmax>2442</xmax> <ymax>790</ymax>
YOLO         0 0.645597 0.174558 0.205019 0.296086
Annot8 already uses COCO’s convention (top-left corner, then width and height), so COCO is the same four numbers rounded. For VOC, the far corner is the near corner plus the size (1,772.6 + 669.2 = 2,441.8, so 2,442), and the near corner gains 1 for VOC’s 1-based pixels. For YOLO, the centre is 1,772.6 + 669.2 / 2 = 2,107.2 pixels, and 2,107.2 / 3,264 = 0.6456; the width is 669.2 / 3,264 = 0.2050; and the class is 0 because apple comes first in our class list.
How to annotate images for object detection, step by step
1. Define the classes, in writing
Ultralytics’ data collection guide says “The number of classes should be determined by the specific goals of your project”, and asks for consistency: “Set standard criteria for annotating different types of data, so all annotations follow the same rules.” Write one line per class, edge cases included. Ours:
- apple: any whole apple, with the stem left out.
- banana: one box per banana, even in a bunch.
- orange: any whole orange-skinned citrus, tangerines included.
Everything else gets no box: lemons, limes, pears and nuts are all in our photos, and none of them is a class. The order of the list becomes the YOLO class numbers (0 apple, 1 banana, 2 orange), so fix it before you convert anything.
2. Collect images like the ones the model will see
Ultralytics’ tips for best training results put it plainly: “Must be representative of deployed environment.” They suggest images “from different times of day, different seasons, different weather, different lighting, different angles, different sources”. Our photos mix a plate on a desk, a bowl on a dark table and fruit spread on wood.
3. Draw tight boxes
“Labels must closely enclose each object. No space should exist between an object and its bounding box,” say the same Ultralytics tips. The PASCAL VOC annotation guidelines allow one exception: a box “should contain all visible pixels, except where the bounding box would have to be made excessively large to include a few additional pixels (<5%) e.g. a car aerial.” We treated apple stems like the aerial.
4. Label every instance
“All instances of all classes in all images must be labeled. Partial labeling will not work,” say the Ultralytics tips. An apple left unboxed is an apple the model is taught to call background. The VOC guidelines list the only exceptions: when “you are unsure what the object is”, when “the object is very small (at your discretion)”, or when “less than 10-20% of the object is visible, such that you cannot be sure what class it is.”
5. Box the visible part of hidden and cut-off objects
VOC: “Mark the bounding box of the visible area of the object (not the estimated total extent of the object).” VOC then flags such objects: truncated “If more than 15-20% of the object lies outside the bounding box”, occluded “If more than 5% of the object is occluded within the bounding box”. YOLO’s text format has no field for either flag, so for YOLO the visible box is all you record. The orange half hidden behind a lime in our bowl photo should get a box around only the part you can see.
6. Add a few background images
Ultralytics: “We recommend about 0-10% background images to help reduce FPs (COCO has 1000 background images for reference, 1% of the total). No labels are required for background images.” FPs are false positives. Our demo set has one, a bowl of empty produce baskets. That’s one image in four, far more than you’d want in a real dataset, but it shows how an empty image travels through each step.
7. Check the labels by drawing them back
The Ultralytics tips call it label verification: “View train_batch*.jpg on train start to verify your labels appear correct”. You can do the same before training by drawing the converted labels back onto a few photos, as we do below. Ours shows Annot8’s offset at a glance.
How to annotate images in Annot8
Annot8 is a $1.99 Mac app (macOS 14 or later) that opens a folder of images, lets you drag a box around each object and name it, and exports every box as a CSV file. There’s no account and nothing to upload: it reads the folder you choose and writes the CSV where you save it, and its App Store privacy label is Data Not Collected.
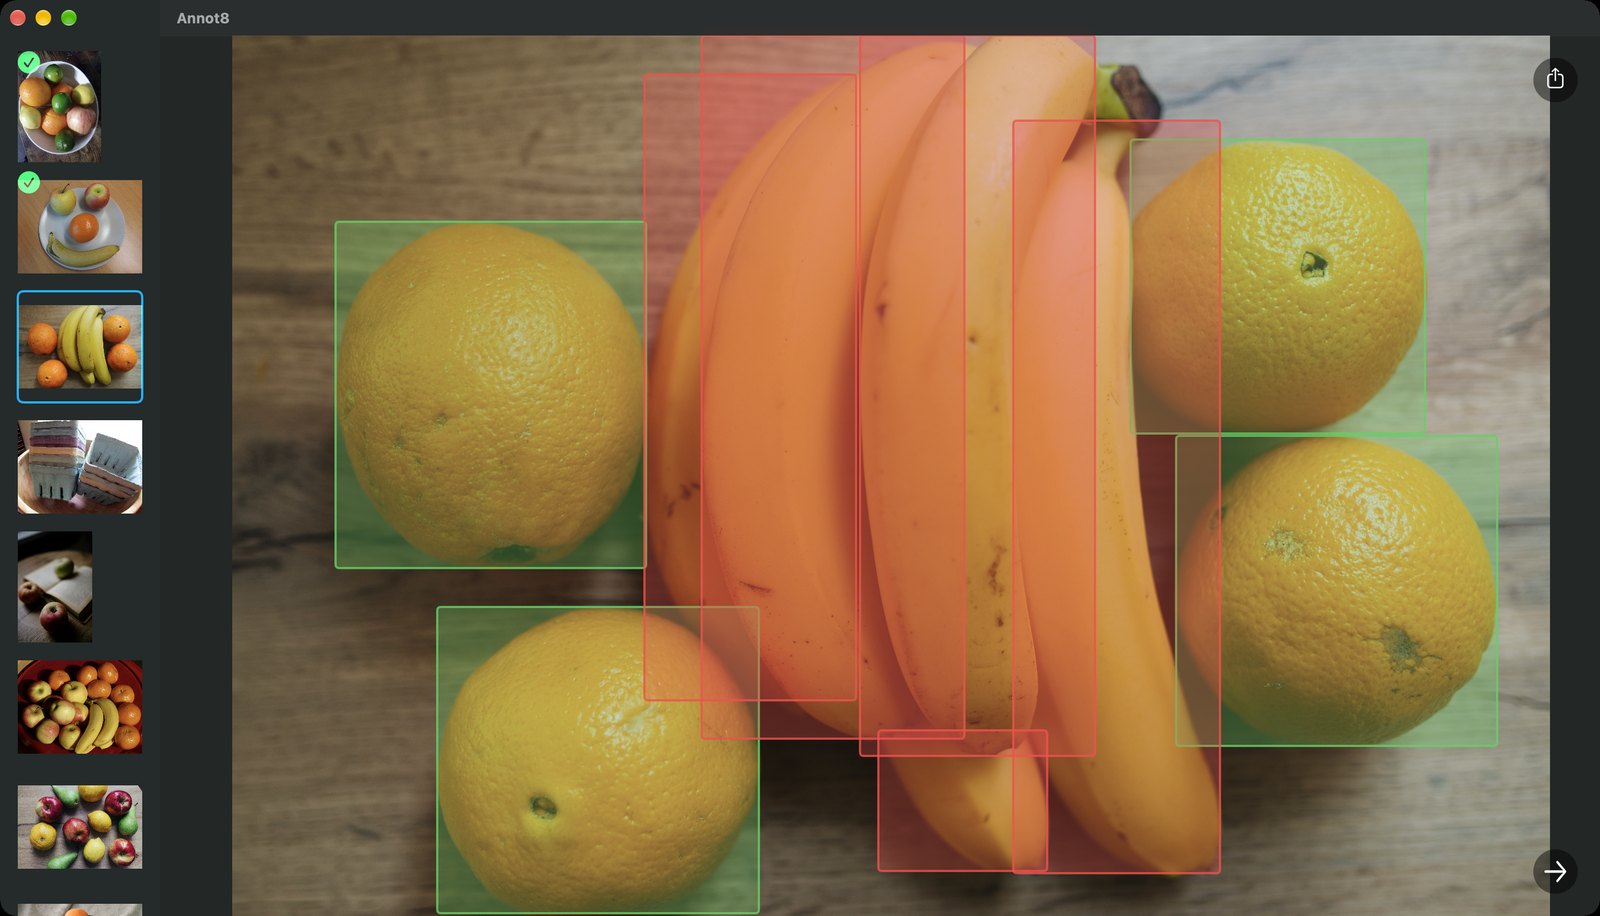

- Put the images in one folder. Annot8 opens the JPEG and PNG files at the top level of the folder; subfolders and other formats are skipped.
- Open the folder. Click Select File and choose the folder, or drag the folder onto the Drag & Drop here box. The thumbnails fill the sidebar.
- Pick an image by clicking its thumbnail.
- Drag a box around an object. When you let go, a Data Label dialog asks for the class: type it and press Return, or click one of the labels you’ve already used, which appear as coloured buttons. Cancel throws the box away.
- Fix a mistake by deleting it. Double-click a box to remove it, then draw it again. Boxes can’t be moved, resized or relabelled.
- Move on with Command-N or the arrow button at the bottom right. There’s no previous-image key, so click a thumbnail to go back. A tick appears on each thumbnail you’ve moved on from; it means visited, not finished.
- Export. Click the share button at the top right, which appears once anything is labelled, and save annotations.csv.
Annot8 doesn’t save a project file, so the boxes live only in memory until you export. Closing the window keeps them, and File > New Window or the Dock icon brings them back, but quitting Annot8 loses them. It exports CSV only, which is why the script further down exists, and it has no zoom.
What does Annot8’s CSV export look like?
One row per image in the folder: the filename, then a label and an “x, y, width, height” string for each box, where x and y are the box’s top-left corner measured from the top-left of the image. These are the header and two rows of our export, unedited:
Filename,Label 1,CGRect 1,Label 2,CGRect 2,Label 3,CGRect 3,Label 4,CGRect 4,Label 5,CGRect 5,Label 6,CGRect 6,Label 7,CGRect 7,Label 8,CGRect 8,Label 9,CGRect 9,
"plate-apples-orange-banana.jpg","apple","863.9090909090909, 185.45454545454544, 703.1818181818181, 717.090909090909","apple","1772.6363636363635, 64.9090909090909, 669.1818181818181, 724.8181818181818","orange","1363.090909090909, 859.2727272727273, 800.5454545454545, 788.1818181818181","banana","783.5454545454545, 1360.0, 1910.181818181818, 907.1818181818181",,,,,,
"empty-produce-baskets.jpg",,,,,,,,,,
- Columns. The header has a Label and CGRect pair for the most boxes on any one image (nine, on the bananas photo). Rows with fewer boxes end sooner: Annot8 pads them with empty columns, but only one per missing box where a box takes two, so a row comes up one column short of the header for every box it lacks.
- Units. Annot8 measures in the image’s points, which are the same as pixels for a 72 DPI image. Two of the eight photos we downloaded were saved at 240 and 180 DPI, and macOS sizes those at 72/240 and 72/180 of their pixel dimensions: the 2,250 by 1,577 pixel photo is 675 by 473.1 points. Boxes on such a photo come out in those smaller units. Dividing by the same point size, as our script does, gives the right YOLO numbers either way.
- Empty rows. A background image gets a row with only its filename, and so does an image you never labelled. Our export had three photos we hadn’t got to, each looking exactly like the background row. Delete those rows, or keep unfinished images out of the folder, before you convert, or they’ll train the model that their fruit is background.
- The offset. When a photo fills the height of Annot8 1.1’s image area, as all of ours did, the app stores each box 10 screen points to the right of where you drew it. Across our 17 boxes that was 30 to 43 pixels, 0.8 to 1.7 percent of the image width depending on how large the photo was drawn on screen, while y, width and height came out within 1.6 pixels of what we drew. A photo wide enough to fill the area’s width instead (wider than about 1.6:1 in our window, such as 16:9) gets a different error: boxes come out about 1.5 percent too small, shifted right by up to 20 points (most near the photo’s left edge, almost none near its right edge) and moved up to about 5 points toward the photo’s vertical middle. Labels from Annot8 1.1 carry these errors into training.
How to convert Annot8’s CSV to YOLO
A short Python script does it: it reads the CSV, divides each box by its image’s size, writes one .txt per image, splits the images into training and validation folders, and writes data.yaml. It needs Python 3 and Pillow (pip install pillow).
"""Convert an Annot8 CSV export into a YOLO dataset: labels, a train/val split and data.yaml.

usage: python annot8_to_yolo.py annotations.csv photos/ dataset/ --classes apple banana orange
"""
import argparse, csv, random, shutil
from pathlib import Path
from PIL import Image


def size_in_points(path):
    """Annot8 measures boxes in points: pixels x 72 / DPI (a 72 DPI photo is the same in both)."""
    with Image.open(path) as im:
        dpi_x, dpi_y = (float(d) or 72 for d in im.info.get("dpi", (72, 72)))
        return im.width * 72 / dpi_x, im.height * 72 / dpi_y


def boxes(row):
    """A row is the filename, then a label and an "x, y, width, height" string per box."""
    cells = [c for c in row[1:] if c.strip()]
    for label, rect in zip(cells[0::2], cells[1::2]):
        x, y, w, h = (float(v) for v in rect.split(","))
        yield label.strip(), x, y, w, h


def main():
    ap = argparse.ArgumentParser()
    ap.add_argument("csv")
    ap.add_argument("images")
    ap.add_argument("out")
    ap.add_argument("--classes", nargs="+", required=True, help="class names in id order: 0 1 2 ...")
    ap.add_argument("--val", type=float, default=0.2, help="share of images for validation")
    ap.add_argument("--seed", type=int, default=0)
    a = ap.parse_args()

    ids = {name: i for i, name in enumerate(a.classes)}
    with open(a.csv, newline="", encoding="utf-8") as f:
        rows = [r for r in list(csv.reader(f))[1:] if r and r[0]]
    names = sorted(r[0] for r in rows)
    random.Random(a.seed).shuffle(names)
    val = set(names[:round(len(names) * a.val)])
    out = Path(a.out)

    for row in rows:
        name, split = row[0], "val" if row[0] in val else "train"
        W, H = size_in_points(Path(a.images) / name)
        lines = []
        for label, x, y, w, h in boxes(row):
            if label not in ids:
                raise SystemExit(f"{name}: '{label}' is not in --classes")
            x0, y0, x1, y1 = max(0, x), max(0, y), min(W, x + w), min(H, y + h)  # clip to the image
            if x1 > x0 and y1 > y0:
                lines.append(f"{ids[label]} {(x0 + x1) / 2 / W:.6f} {(y0 + y1) / 2 / H:.6f} "
                             f"{(x1 - x0) / W:.6f} {(y1 - y0) / H:.6f}")
        for sub in ("images", "labels"):
            (out / sub / split).mkdir(parents=True, exist_ok=True)
        shutil.copy2(Path(a.images) / name, out / "images" / split / name)
        (out / "labels" / split / f"{Path(name).stem}.txt").write_text("".join(l + "\n" for l in lines))
        print(f"{split:<5} {name}: {len(lines)} boxes")

    # No "path:" line: Ultralytics then treats the folder data.yaml is in as the dataset root.
    names_yaml = "".join(f"  {i}: {n}\n" for i, n in enumerate(a.classes))
    (out / "data.yaml").write_text(f"train: images/train\nval: images/val\nnames:\n{names_yaml}")


if __name__ == "__main__":
    main()
We deleted the rows of the four photos we didn’t use, put the four we did use in a folder called photos, and ran:
$ python annot8_to_yolo.py annotations.csv photos fruit-yolo --classes apple banana orange
train bowl-oranges-limes-apple.jpg: 4 boxes
val   plate-apples-orange-banana.jpg: 4 boxes
train table-bananas-oranges.jpg: 9 boxes
train empty-produce-baskets.jpg: 0 boxes
It wrote this data.yaml:
train: images/train
val: images/val
names:
  0: apple
  1: banana
  2: orange
Ultralytics’ example data.yaml also has a path: line for the dataset root. Leave it out and Ultralytics (version 8.4.173 in our test) uses the folder the YAML file is in, so the dataset folder can move. The plate photo’s label file, labels/val/plate-apples-orange-banana.txt, holds the two apples (class 0), the orange (2) and the banana (1):
0 0.372396 0.222222 0.215436 0.292929
0 0.645597 0.174558 0.205019 0.296086
2 0.540246 0.511995 0.245265 0.321970
1 0.532670 0.740846 0.585227 0.370581
The background photo’s label file is empty, which is allowed: Ultralytics’ fine-tuning guide says “Individual missing or empty label files are treated as background images”. The script also stops on any label that isn’t in --classes, so a typo like “aple” can’t quietly become a fourth class, and it clips boxes to the image, since a drag that starts on the photo in Annot8 keeps going after the pointer leaves it, and the offset above can push a box drawn to the photo’s right edge past it.
Ultralytics’ own dataset loader read the result with no complaints: “3 images, 1 backgrounds, 0 corrupt” for the training folder and “1 images, 0 backgrounds, 0 corrupt” for validation. Then we drew the plate’s labels back onto the photo:

How many images do you need for object detection?
For a model you’ll rely on, Ultralytics recommends at least 1,500 images and 10,000 labelled objects per class. Its training tips say “≥ 1500 images per class recommended” and “≥ 10000 instances (labeled objects) per class recommended”. To get started, its data collection guide is gentler: “A few hundred annotated objects per class is enough to start experimenting with transfer learning, but for reliable real-world performance Ultralytics recommends at least 1,500 images and 10,000 labeled instances per class.”
The fine-tuning guide adds that there’s no fixed minimum: results depend on how complex the task is, how many classes there are, and how close your images are to COCO’s. Our 17 boxes over three classes are a demonstration of the formats, nowhere near a trainable dataset.
How to split images into training and validation sets
Split by image, not by box, and hold back roughly 10 to 20 percent of the images for validation. Ultralytics’ preprocessing guide says “A common split is 70% for training, 20% for validation, and 10% for testing.” Its autosplit function defaults to weights of (0.9, 0.1, 0.0), and it assigns each image at random, so the shares come out roughly rather than exactly. Our script shuffles with a fixed seed and puts 20 percent of the images in val, one of our four.
Never train on the validation images: a model scored on images it learned from looks better than it is, the same reason AI stock forecasts are judged on data they never saw.
Image annotation tools compared
Prices as listed on each vendor’s site on October 4, 2026:
| Tool | Where it runs | Price | Detection exports |
|---|---|---|---|
| CVAT | Browser. Self-host the open-source Community edition (MIT licence, with Docker) or use CVAT Online | Community: free. Online: free plan (1 project, 3 tasks, annotations-only export); Solo $23 a month billed yearly, $33 monthly | YOLO 1.1, Ultralytics YOLO Detection 1.0, COCO 1.0, PASCAL VOC 1.1 and more |
| Label Studio | Browser. Self-host the open-source Community Edition (Apache 2.0, pip or Docker) or use Starter Cloud | Community: free. Starter Cloud: $99 a month, $49 a month per extra user | YOLO, COCO, Pascal VOC XML, plus JSON, CSV and TSV |
| Roboflow | Browser, hosted | Free tier with 10 credits a month; Core $39 a month | YOLO, COCO JSON, Pascal VOC XML, CreateML and others |
| LabelImg | Desktop app (Python and Qt), pip3 install labelImg |
Free (MIT licence) | Pascal VOC XML, YOLO, CreateML |
| Annot8 | Mac app, macOS 14 or later | $1.99, once | CSV, one row per image |
CVAT’s install guide adds that “Google Chrome is the only browser that is supported by CVAT.” LabelImg’s GitHub repository “was archived by the owner on Feb 29, 2024”, its README says it “is no longer actively being developed and has become part of the Label Studio community”, and its latest release on PyPI is 1.8.6, from October 2021. If you want boxes straight out in YOLO or COCO, CVAT, Label Studio and Roboflow export them directly; Annot8 is the native, one-payment Mac option, with the CSV step above.
Image annotation questions
What’s the difference between YOLO, COCO and Pascal VOC annotations?
They store the same box three ways. YOLO keeps one text file per image with the class number and the box’s centre, width and height as fractions of the image size; COCO lists every image and box in one JSON structure, each box as [x, y, width, height] in pixels from the top-left corner; Pascal VOC keeps one XML file per image with the two corners in pixels, counting the top-left pixel as (1, 1).
How tight should a bounding box be?
As tight as the object’s visible edge. Ultralytics says “No space should exist between an object and its bounding box”, and the PASCAL VOC guidelines only let you leave out a few pixels, under 5 percent, when including them would make the box excessively large, like a car’s aerial.
Should I label objects that are partly hidden or cut off by the edge?
Yes: box the part you can see, not where you guess the rest is. Skip an object only when so little is visible, under 10 to 20 percent in the VOC guidelines, that you can’t tell what it is.
Do images with no objects need a label file?
No. Ultralytics says “If there are no objects in an image, no *.txt file is required”, and its fine-tuning guide treats missing or empty label files as background images. Keep them to about 0 to 10 percent of the dataset, as the Ultralytics tips recommend.
How many images do I need to train YOLO?
Ultralytics recommends at least 1,500 images and 10,000 labelled objects per class for reliable results, and says a few hundred annotated objects per class is enough to start experimenting with transfer learning. There’s no fixed minimum; harder tasks and more classes need more.
How we tested this
We read every source file of Annot8 1.1, which matches the version on the Mac App Store except for the name of the app’s main struct (Image_AnnotationsApp in our copy, Annot8App in the shipped app). We then built that unmodified source with Xcode 26.6 on macOS 27 and drove it with synthetic mouse and keyboard events, posted to Annot8’s own event queue by a test driver compiled into our build, in a 1440 by 824 point window. The only stand-ins were the macOS open and save panels, which run in a separate process: we replaced them so Annot8 received our folder and save location. Annot8’s own code read the folder, drew every box and wrote the CSV with its export button. We found each fruit’s edges on zoomed views of the full-size photos, then dragged those boxes where Annot8 drew the photo on screen. We finished three fruit photos and the background image before stopping; a fifth photo’s labels came out wrong when another app took focus mid-drag, so we left it out.
We compared all 17 exported boxes with the boxes we dragged, which is where the 10-point offset comes from. The figures for photos that fill the width come from a second run of the same unmodified source on October 10, 2026, in the same 1440 by 824 point window, with a synthetic 16:9 test image of coloured rectangles at known positions. That run used more stand-ins: its test driver loaded the test images itself instead of letting Annot8 read the folder, made Annot8 count as the active app with its window key, sent key presses straight to that window, and called the share button’s export code instead of clicking it. We checked the point sizes of all eight downloaded photos with macOS’s own image loader, ran the converter with Python 3.14.7 and Pillow 12.3.0, loaded the result with Ultralytics 8.4.173, and drew the check image with Pillow. The format rules, labelling guidelines, prices and app details come from the pages listed below, all read on October 4, 2026. The photos are from Wikimedia Commons; their licences are listed under Image credits.
References
- Ultralytics. Object Detection Datasets Overview.
- Ultralytics. Tips for Best YOLOv5 Training Results.
- Ultralytics. CV Data Collection and Annotation Guide.
- Ultralytics. Preprocessing Annotated CV Data.
- Ultralytics. Fine-Tune YOLO26 on a Custom Dataset.
- Ultralytics. Reference: data/split (autosplit) and data/utils.
- COCO Consortium. Data format and home page.
- Everingham, M. and Winn, J. The PASCAL Visual Object Classes Challenge 2012 Development Kit.
- PASCAL VOC. Annotation Guidelines and VOC2012 dataset page.
- CVAT. CVAT Online pricing, export formats, CVAT Community, installation guide and GitHub repository.
- Label Studio. Export annotations, install, HumanSignal pricing and GitHub repository.
- Roboflow. Pricing, formats and exporting data.
- LabelImg. GitHub repository and PyPI page.
- Apple. Annot8: Label Images for AI on the Mac App Store.
Image credits
- Objects on a desk detected with a YOLOv3 model trained on COCO · Photo: MTheiler, CC BY-SA 4.0 (Cropped and resized)
- Happy fruits: two apples, an orange and a banana on a plate · Photo: Tristan Schmurr, CC BY 2.0 (Resized, with our converted labels drawn on it; also shown in an Annot8 screenshot)
- A group of ripe bananas next to several oranges · Photo: Shixart1985, CC BY 2.0 (Shown in an Annot8 screenshot with bounding boxes drawn over it)
- Fruits in bowl: oranges, limes, lemons and an apple · Photo: Gerardolagunes, CC0 1.0 (Shown as a thumbnail in an Annot8 screenshot)
- Empty pint-sized molded pulp produce baskets in a wooden bowl · Photo: Kayaker, CC BY-SA 4.0 (Shown as a thumbnail in an Annot8 screenshot)
- Three apples, red and green, near an open book on a wooden table · Photo: Shixart1985, CC BY 2.0 (Shown as a thumbnail in an Annot8 screenshot)
- Bananas, apples and tangerines in a red bowl · Photo: Hans Braxmeier, CC0 1.0 (Shown as a thumbnail in an Annot8 screenshot)
- Red apples, green pears and yellow lemons on a wooden surface · Photo: Shixart1985, CC BY 2.0 (Shown as a thumbnail in an Annot8 screenshot)
- Nuts, apples and oranges in a bowl · Photo: Zeynel Cebeci, CC BY-SA 4.0 (Shown as a thumbnail in an Annot8 screenshot)