 Haplo
Haplo
Beginner Gym Workout Plan: 6 Weeks, 2 to 3 Days a Week
Two or three short full body sessions a week for six weeks, built mostly on machines so you can learn each movement without having to balance it. Every set, rep and rest is here, with how to set up a machine, pick your weights and tell it's working.
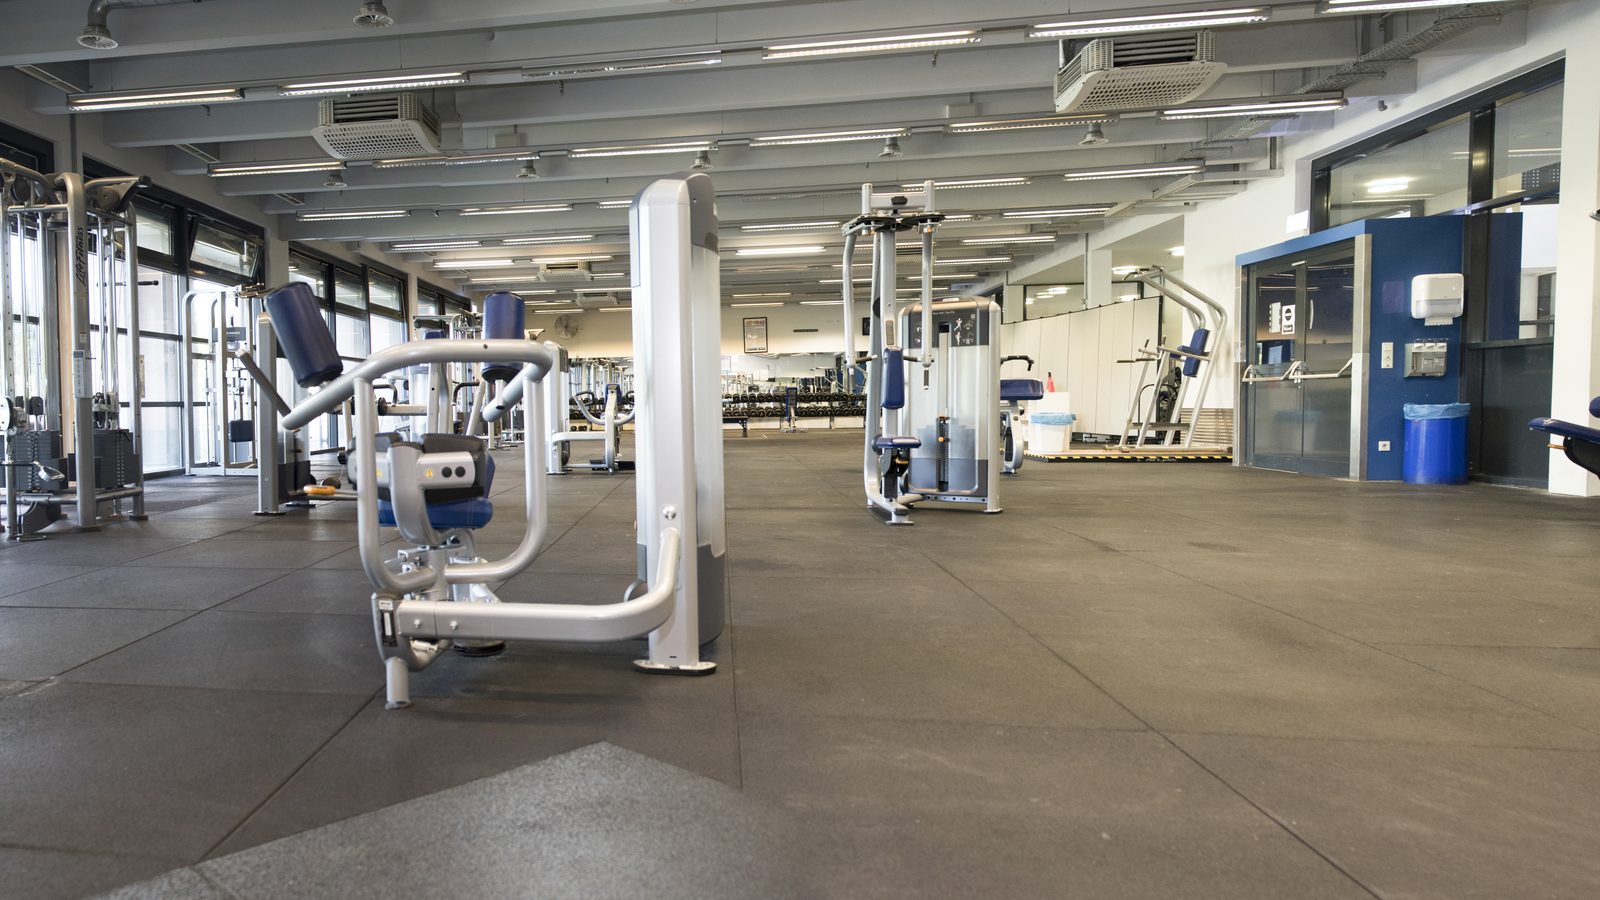
Walking into a gym for the first time, or for the first time in years, is mostly a problem of too many options. Rows of machines, a wall of dumbbells, cable stations with handles you’ve never seen, and no obvious place to start.
This beginner gym workout plan gives you that place to start, for six weeks. You train two or three days a week, and every session is full body with the same shape: something for your legs, a press, a pull, then something small. Sets stay at three and reps stay around twelve, so there’s room to practise. Most of the work happens on machines, and the free weights come in gradually: a goblet squat and a dumbbell bench press on the second day, an incline dumbbell press on the third.
The plan is Beginner Gym Start, from Cinder, the workout tracker we make, and it’s reproduced here exactly as the app ships it: every exercise, set, rep, rest time and note. Around it we’ve added what doesn’t fit on one screen: how to set up each machine, how heavy to start, what to do when your machine is taken, and how to tell it’s working.
Why a beginner gym workout should start on machines
A machine fixes the path of the movement. The handles of a chest press can only travel one way, so you don’t have to balance the weight or find the groove: you sit down, push, and put your attention on twelve good reps. That’s the reasoning behind the plan, and it’s why Day A is all machines apart from the plank.
You give up very little by starting there. A 2023 meta-analysis of 13 studies found no difference in muscle growth between free-weight and machine training (Haugen 2023). It did find that strength is specific to how you train: free-weight training improved free-weight strength more, and machine training tended to do the same for machine strength. That’s why the plan doesn’t stay on machines. Days B and C bring in dumbbells, so by week six you’ve learned both.
Who it’s for
Anyone new to lifting, or coming back after months or years away. You don’t need to know any lifts, just access to a gym with machines, dumbbells and a cable station. It’s a gym workout plan for beginners in the plainest sense: nothing in it assumes you’ve done it before.
If you have a heart condition, take medication that changes your heart rate (beta blockers, for example), are pregnant, or are recovering from an injury or surgery, talk to your doctor or a physio before you start. The plan is gentle, but that conversation is worth having.
How to use it
Pick your days. Two or three a week, with at least one rest day between sessions. Day A and Day B happen every week; Day C is the third day, for weeks you have one. The layout stays the same for all six weeks.
Start easy. Week 1 is for finding your weights, not for working hard: each set should end with about three good reps still in you. The first sessions will take longer than the listed times while you work out seat heights and weights, and that’s normal.
Follow the weeks. Each session below lists the sets, reps and rest for every exercise, with a cue for doing it well and a swap for when the machine is busy. After the sessions, the week-by-week list says what to change each week, and the notes after that cover warming up, rest, soreness and gym etiquette.
The session times are Cinder’s estimate of the lifting itself, 31 to 38 minutes. Add about ten minutes for a warm-up and for setting up machines.
Two or three full body days, the same shape each time
Every session trains your legs, then a press and a pull, then something small, at 3 sets of about 12. Days A and B are the core of the plan and happen every week; Day C is the third day, for weeks you have one.
- Length
- 6 weeks
- Days a week
- 2 to 3
- Level
- Beginner
- Kit
- Machines, Dumbbells, Cables
Two days or three: how your week lays out
3 days a week
- Mon · Day A
- Wed · Day B
- Fri · Day C
The days Cinder suggests when your week starts on Monday. If your iPhone’s week starts on Sunday, the default for US and Canadian region settings, it suggests Sunday, Tuesday and Thursday instead. Either way the sessions run A, B, C in the order of your week.
3 days, with a weekend day
- Tue · Day A
- Thu · Day B
- Sat · Day C
Any three days work, as long as there’s a day off between sessions. Put two back to back (Wednesday, Saturday and Sunday, say) and the app still lays the week out, but tells you: “Day B and Day C land on back-to-back days. The plan would rather have a day between them.”
2 days a week
- Mon · Day A
- Thu · Day B
Cinder keeps the two core days, drops Day C, and says so while you set the plan up: “You train fewer days than this plan writes, so Day C is left out each week.” Tap 2 days and it suggests Monday and Thursday (Sunday and Wednesday if your week starts on Sunday). Tuesday and Friday works just as well.
Day A
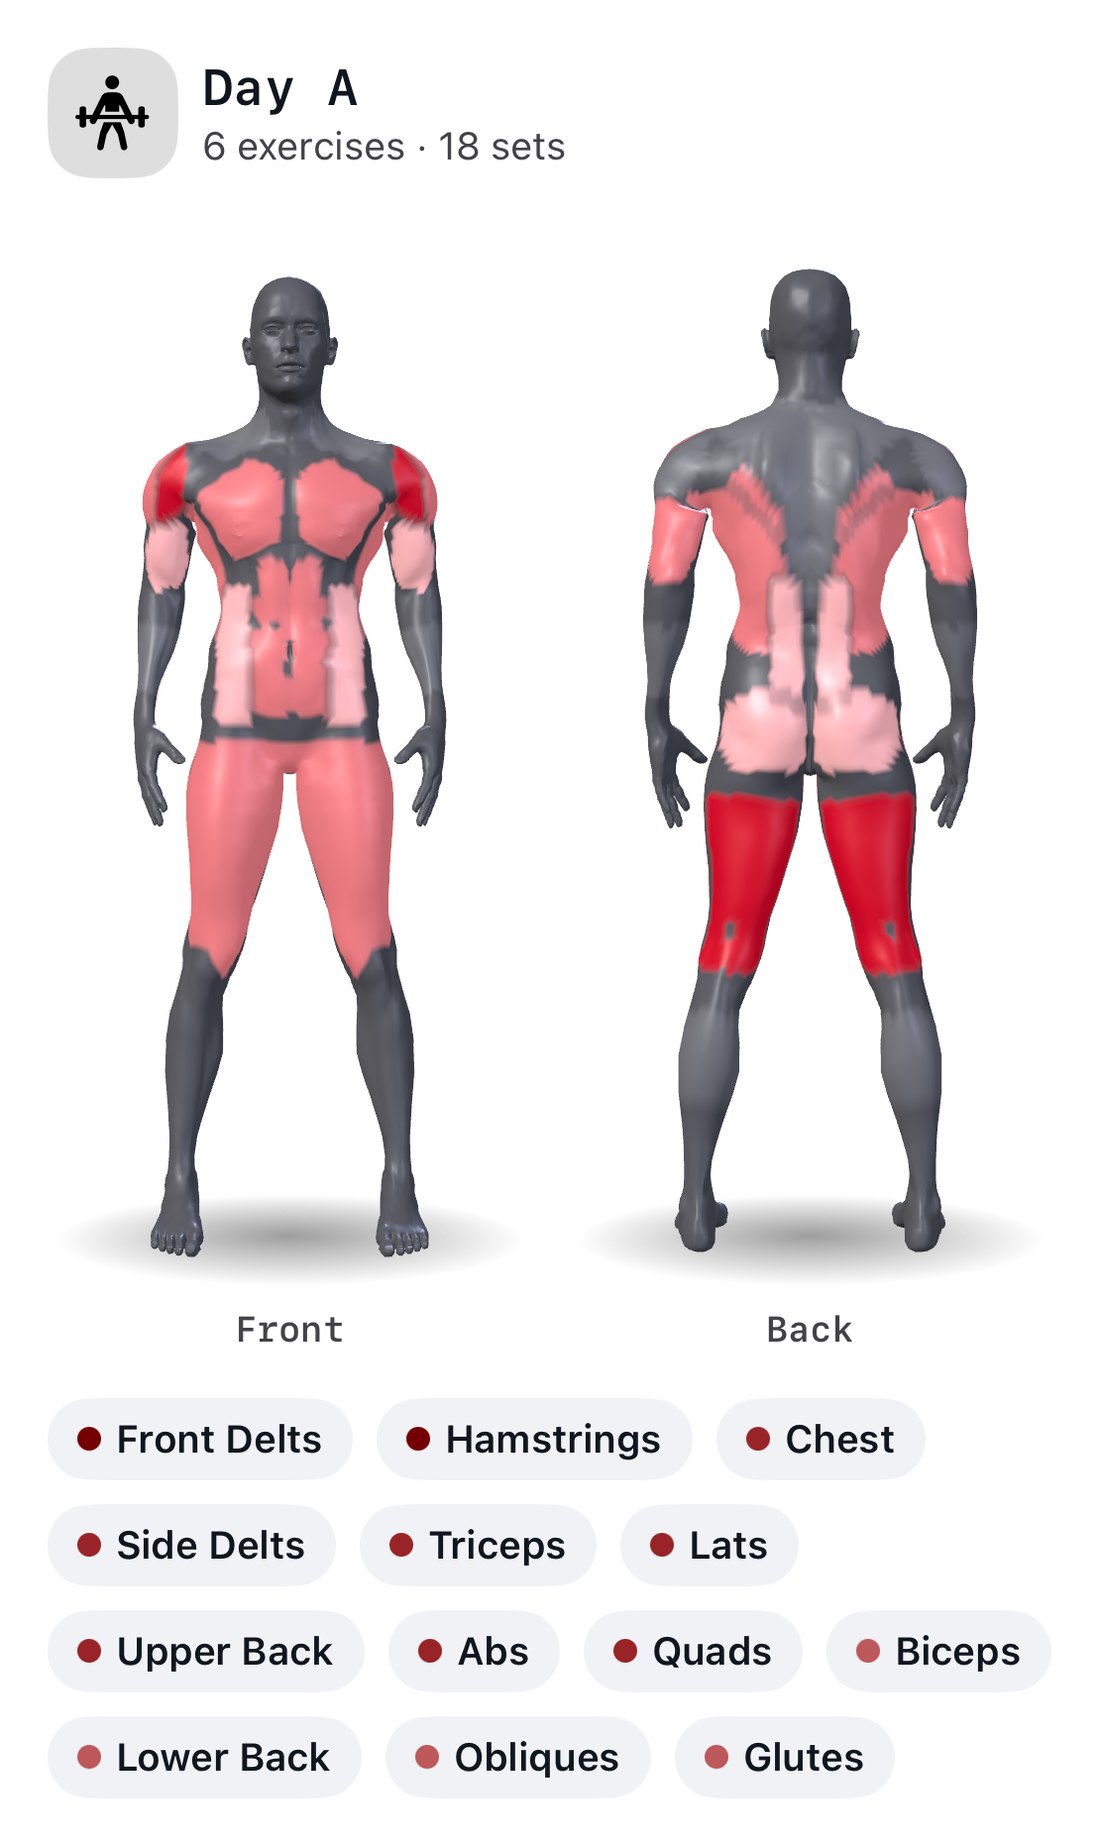
All machines. Learn the movements without balancing them.
Five machines and a plank. This is the day to learn how the kit works: where the seat adjusts, where the pin goes, what a full range feels like. The leg press goes first because it’s the biggest movement of the day and deserves your freshest effort. The chest press and the row come next, then the smaller jobs.
Expect your first Day A to run long. Setting up five machines for the first time takes a while, and so does finding your weights. It gets quicker once you know your seat settings.
-
3 × 12 · Rest 90 s
Leg Press
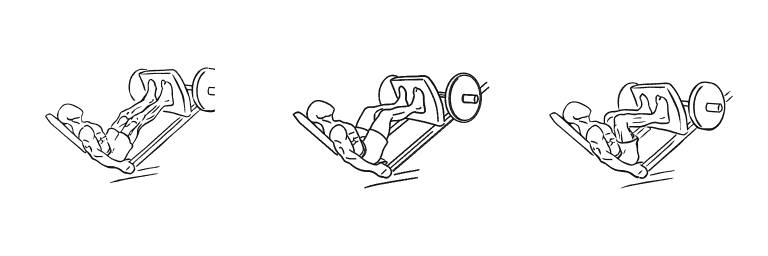
Sit with your back and hips flat against the pad and your feet about hip width in the middle of the platform. Lower the platform under control until your knees reach about a right angle, or deeper if your lower back stays on the pad, then press back up through your whole foot and stop just short of locking your knees. On the angled, plate-loaded kind, find the handles that lock and unlock the sled before you load it.
Swap The hack squat from Day C, or a goblet squat.
-
3 × 12 · Rest 90 s
Machine Chest Press
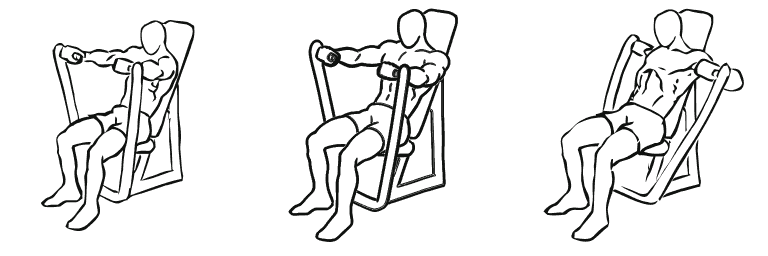
Set the seat so the handles sit level with the middle of your chest. Back against the pad, feet flat, shoulder blades gently drawn back. Press until your arms are straight but not jammed, then let the handles come back slowly until you feel a stretch across your chest.
Swap The dumbbell bench press from Day B, or push-ups with your hands on a bench.
-
3 × 12 · Rest 90 s
Seated Cable Row
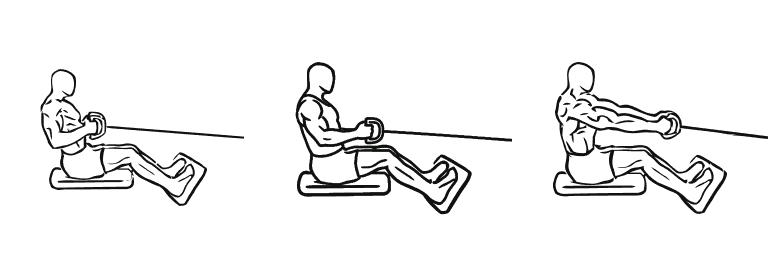
Feet on the platform, knees slightly bent, sitting tall. Pull the handle to the bottom of your ribs by driving your elbows back, squeeze your shoulder blades together for a beat, then let your arms straighten and your shoulders reach forward. Your torso should barely move: if you’re rocking back to shift the weight, it’s too heavy.
Swap The chest supported row from Day C, or a seated row machine.
-
3 × 12 · Rest 1 min
Machine Shoulder Press
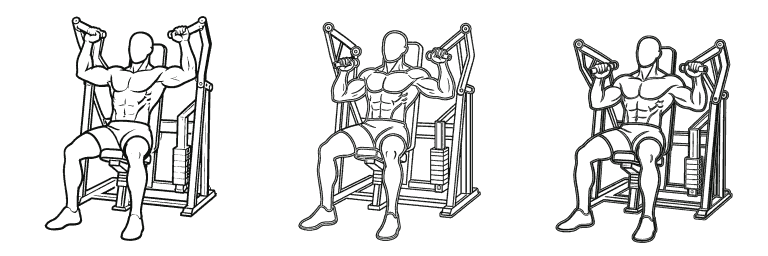
Set the seat so the handles start at about shoulder height. Press up until your arms are nearly straight without shrugging your shoulders toward your ears, then lower back to the start. If the machine offers two grips, use whichever feels better on your shoulders.
Swap A seated dumbbell shoulder press with the bench upright.
-
3 × 12 · Rest 1 min
Leg Curl
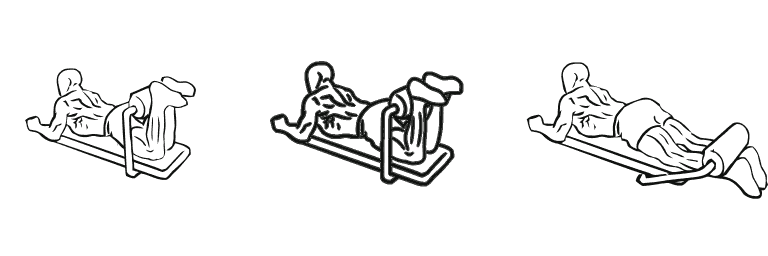
Line your knee up with the machine’s pivot, the point the pad swings around, and set the pad just above your heels. Curl as far as the machine lets you, hold for a beat, and lower slowly. It’s the day’s one exercise aimed squarely at your hamstrings, the muscles on the back of your thigh.
Swap Whichever leg curl is free: lying and seated versions both train the hamstrings.
-
3 × 30 s · Rest 45 s
Plank
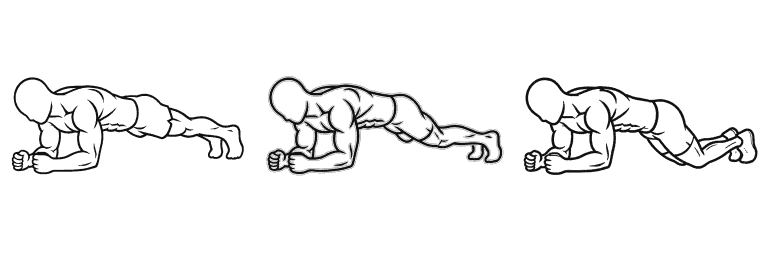
Forearms on the floor with your elbows under your shoulders, body in one straight line from head to heels. Squeeze your glutes and brace your stomach as if someone’s about to poke it. Thirty seconds of a good plank beats a minute of a sagging one: if your hips drop, end the set there.
Swap The dead bug from Day C, or a plank with your knees on the floor.
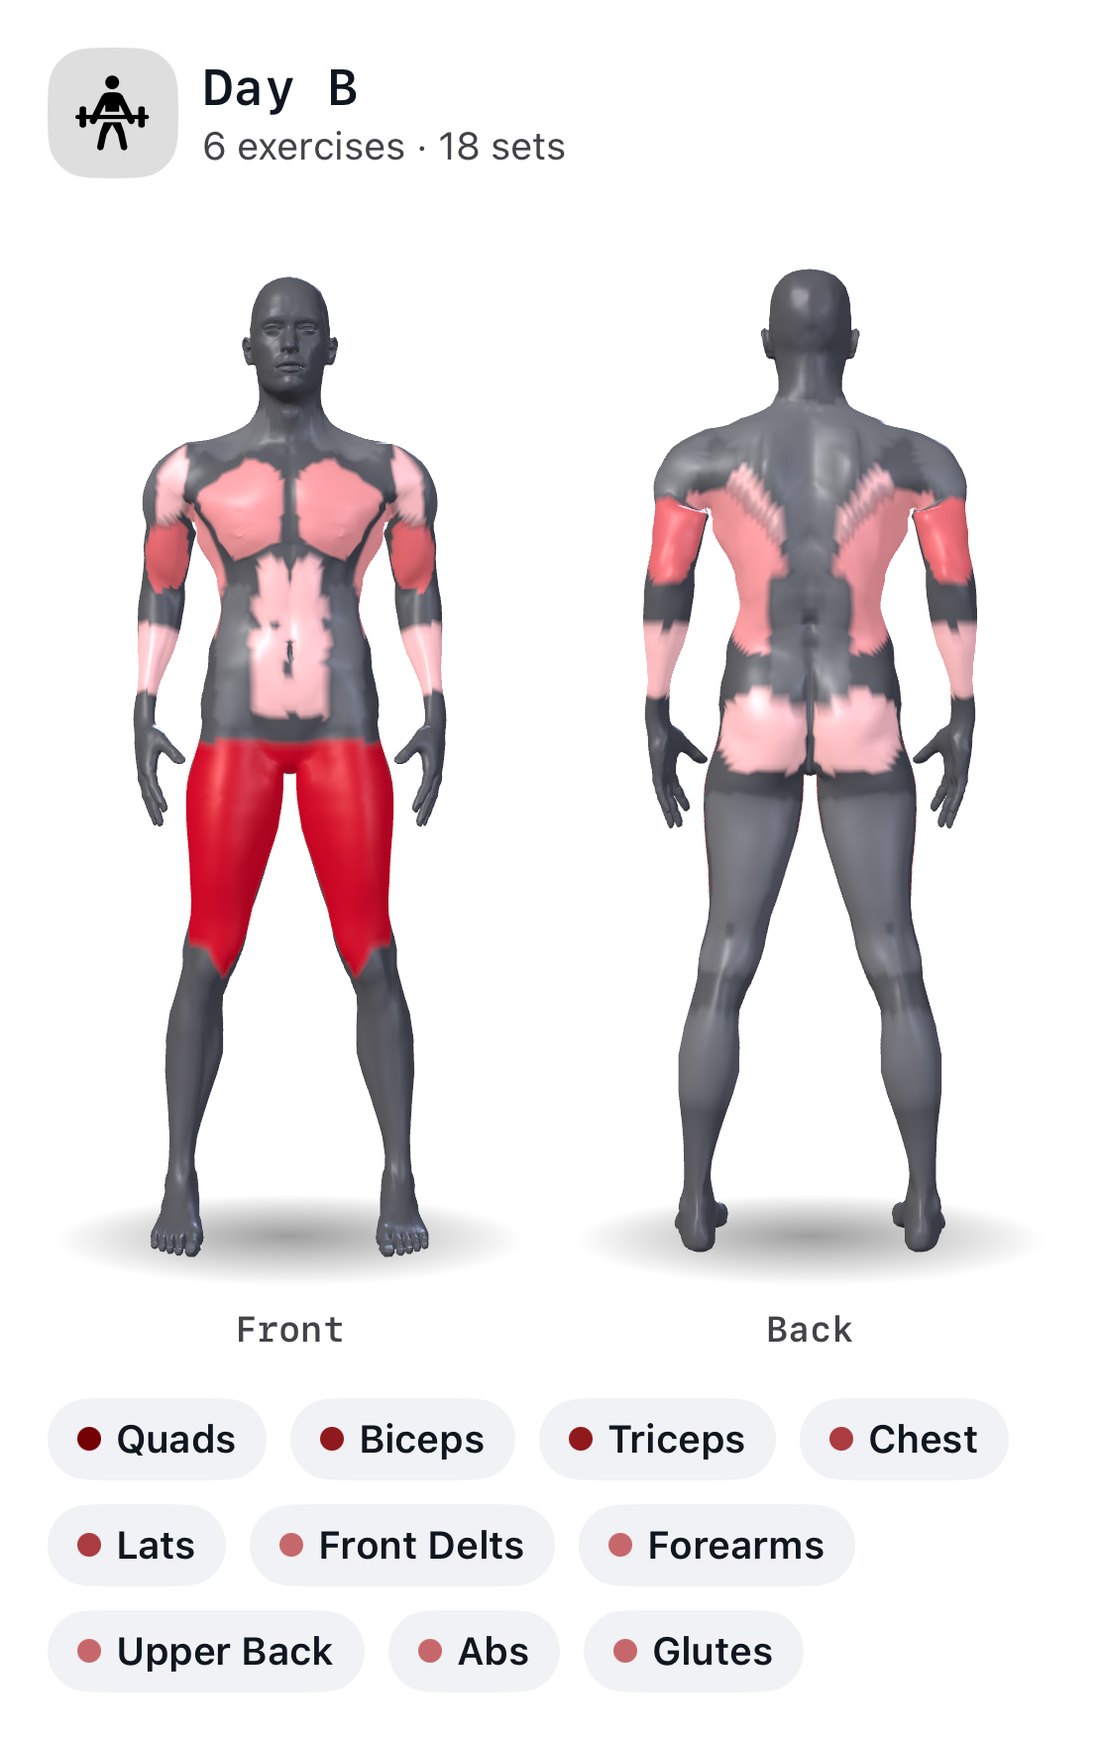
Day B
First free weights, alongside familiar machines.
Two new skills today: the goblet squat and the dumbbell bench press ask you to steady the weight yourself, so they come early while you’re fresh. The lat pulldown pairs with Day A’s row: one pulls down, the other pulls toward you, and between them they cover your back.
The last three are small, single-joint moves: leg extensions for the front of your thighs, then curls and pushdowns for your arms. At about 38 minutes, this is the longest session.
-
3 × 12 · Rest 90 s
Goblet Squat
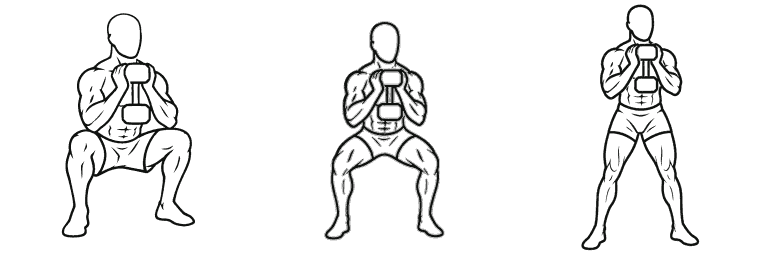
Hold one dumbbell upright against your chest, cupping the top end in both hands. Feet about shoulder width, toes turned out a little. Sit down between your heels with your chest up, as deep as you can while your heels stay down and your back keeps its shape, then stand up. We like it as a first free-weight squat: holding the weight in front of you makes it easier to stay upright.
Swap The leg press from Day A, or a bodyweight squat down to a bench.
-
3 × 12 · Rest 90 s
Lat Pulldown
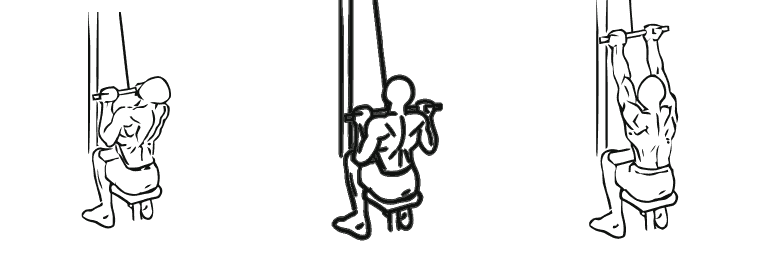
Set the thigh pad so it holds your legs down snugly. Take the bar a little wider than your shoulders, lean back slightly, and pull it to your upper chest by driving your elbows down toward your sides. Let it rise until your arms are straight and you feel the stretch under your arms. If you have to swing your body to get it down, move the pin up a plate.
Swap An assisted pull-up machine, or a single-arm cable pulldown.
-
3 × 12 · Rest 90 s
Dumbbell Bench Press
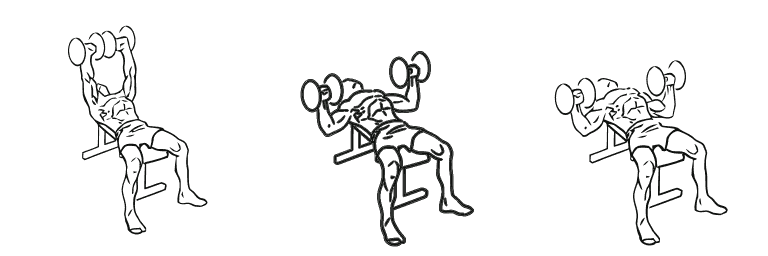
Sit on the end of a flat bench with the dumbbells on your thighs, then lie back and bring them up together. Press up until your arms are straight, then lower slowly until the dumbbells are about level with your chest, elbows angled a little in toward your body rather than flared straight out. To finish, bring them back to your chest and sit up with them instead of dropping them to the floor.
Swap The machine chest press from Day A.
-
3 × 15 · Rest 1 min
Leg Extension
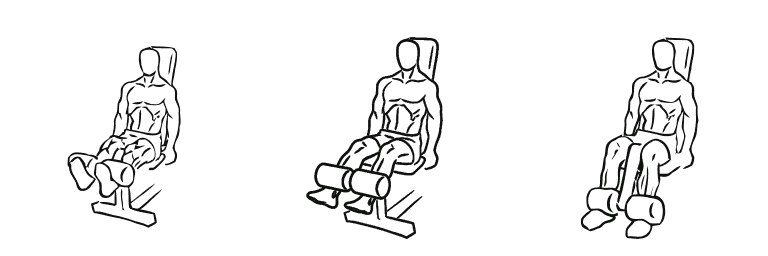
Line your knee up with the machine’s pivot and set the pad on the front of your lower shin, just above the ankle. Straighten your legs, pause for a moment at the top, and lower under control. A burning feeling in the front of your thighs near the end of the set is normal; pain in the knee joint isn’t, so stop if you feel that.
Swap A bodyweight split squat, holding a rack or bench for balance.
-
3 × 12 · Rest 1 min
Bicep Curl
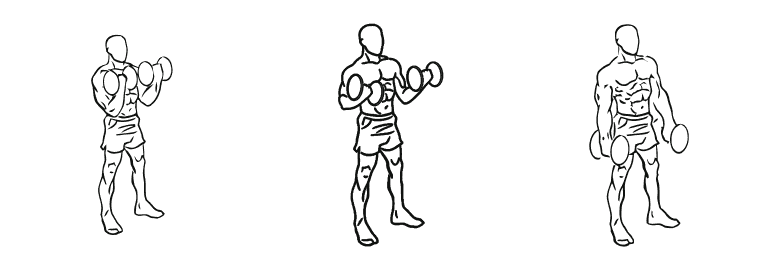
Stand tall with a dumbbell in each hand, palms facing forward. Curl them up without letting your elbows drift forward or your body swing, then lower all the way down. If you have to throw your hips to finish the last reps, the weights are too heavy for now.
Swap Cable curls with a straight bar, or hammer curls.
-
3 × 12 · Rest 1 min
Tricep Pushdown
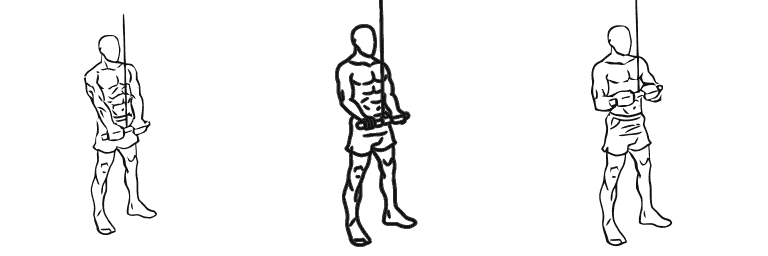
Clip a rope or short bar to the top of a cable station and stand close, elbows tucked against your sides. Push down until your arms are straight, then let your forearms rise to about parallel with the floor while your elbows stay where they are. Only your forearms should move.
Swap An overhead extension, holding one dumbbell in both hands.
Day C
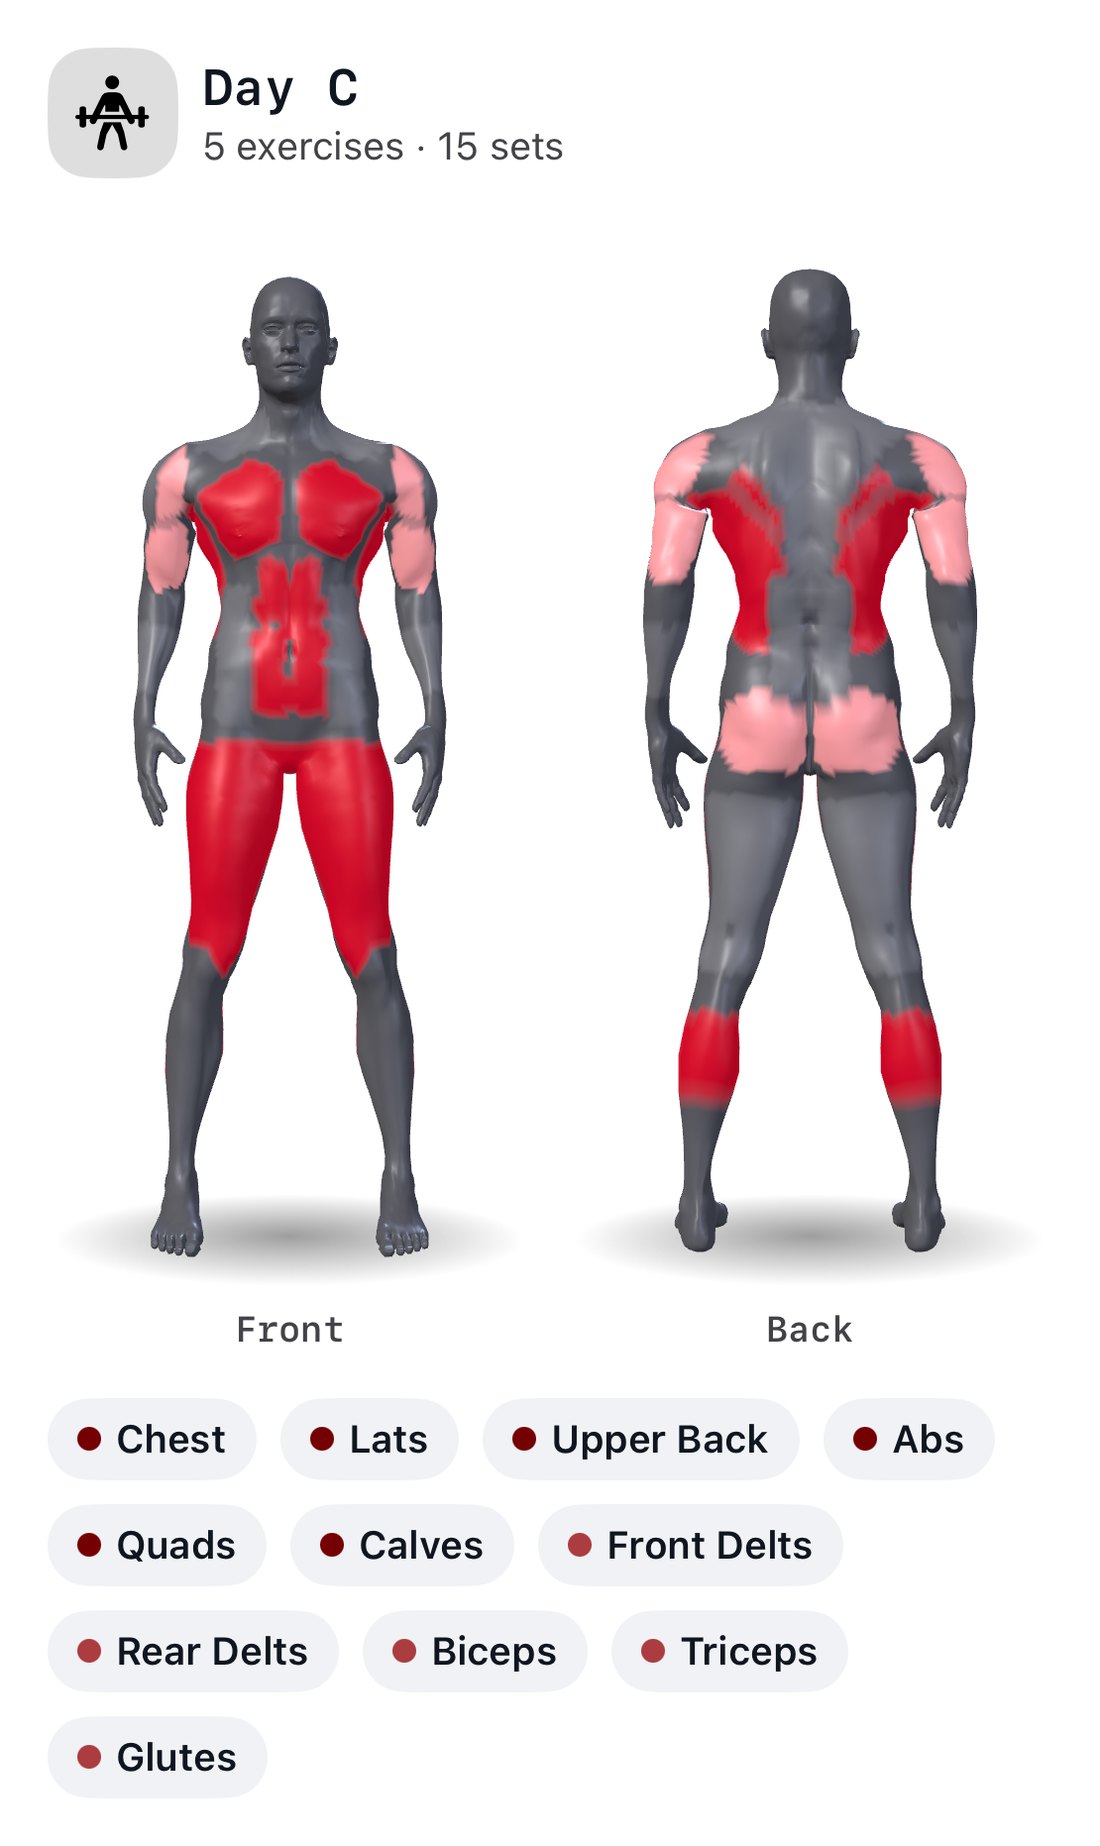
The third day, when there is one. Same shape again.
Different kit, same pattern: a machine squat, a machine row, an incline press, then calves and a slow core exercise. At about 31 minutes it’s the shortest session.
If you train twice a week you won’t see it: the plan marks it as supporting rather than core. If you train three times, it adds a third round of legs, pressing and pulling to your week, plus the plan’s only calf work.
-
3 × 12 · Rest 90 s
Hack Squat
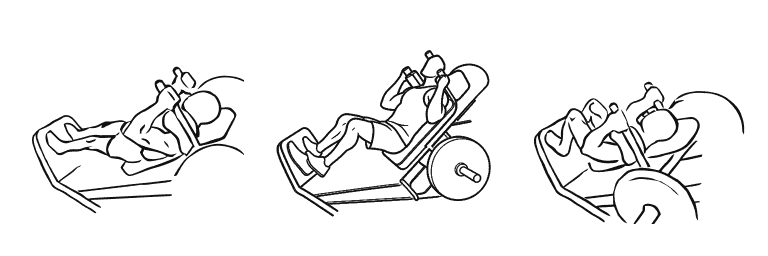
Shoulders under the pads, back flat against the backrest, feet about shoulder width in the middle of the platform. Unlock the safety (usually handles by your hands), then bend your knees and lower as deep as you can while your back stays on the pad and your heels stay down, and drive back up. Lock the safety again before you step out.
Swap The leg press from Day A, or a goblet squat.
-
3 × 12 · Rest 90 s
Chest Supported Row
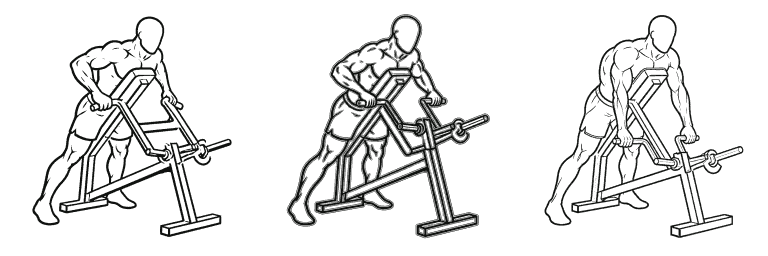
Set the seat so your chest rests against the pad and you can just reach the handles with straight arms. Pull your elbows back toward your hips, squeeze your shoulder blades together, then let your arms straighten. With your chest on the pad, your lower back doesn’t have to hold you in position, so your effort goes into the pull.
Swap Lie face down on an incline bench and row a dumbbell in each hand, or do the seated cable row from Day A.
-
3 × 12 · Rest 90 s
Incline Dumbbell Press
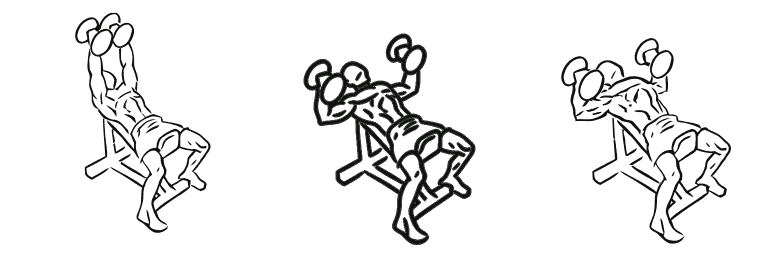
Set the bench to a low incline, about 30 degrees, and set up as for Day B’s flat press. Press the dumbbells up over your upper chest and lower them slowly to chest level. Keep the bench low: in an EMG study of the bench press, 30 degrees brought in the upper chest the most, while angles above 45 degrees shifted the work toward the front of the shoulders.
Swap The dumbbell bench press from Day B, or the machine chest press from Day A.
Research: Rodríguez-Ridao 2020
-
3 × 15 · Rest 1 min
Standing Calf Raise
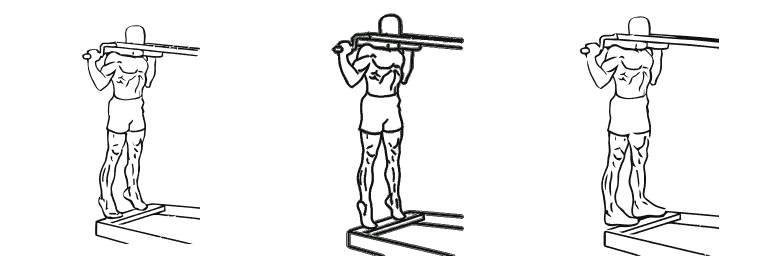
Set the shoulder pads so you stand tall with the balls of your feet on the edge of the step and your heels hanging off. Lower your heels as far as they comfortably go, pause for a second in the stretch, then rise as high as you can onto your toes. Slow and through the full range, with no bouncing at the bottom.
Swap A seated calf raise machine, or calf raises on a step holding a dumbbell.
-
3 × 10 · Rest 45 s
Dead Bug
Each side
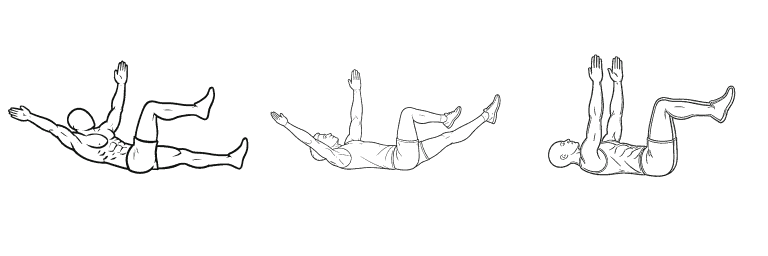
Lie on your back with your arms pointing at the ceiling and your knees bent at right angles above your hips. Press your lower back gently into the floor, then slowly lower one arm and the opposite leg toward the floor as you breathe out, and bring them back. Alternate sides. The point is keeping your back still while your arms and legs move, so go slowly.
Swap The plank from Day A.
Week by week
-
Week 1
Find weights you could do three more reps with.
Start each exercise lighter than you think and adjust between sets: if rep 12 felt like you could have done 20, go up a step; if it was a fight, come down. Write down where you finish. That’s your starting line, and the note on starting weights below explains reps in reserve.
-
Week 2
Same weights. Slow the lowering down.
Keep last week’s weights and take two or three seconds to lower each rep (our suggestion for what slow means), with the lift itself smooth. It’s a control drill rather than a growth trick: muscle growth is similar across rep speeds from half a second to eight seconds (Schoenfeld 2015), but slowing down shows you where each movement gets shaky.
-
Week 3
Add weight to anything that felt easy last week.
Easy means you finished your sets with clearly more than three reps to spare. Add the smallest step you can, one plate down the stack or the next dumbbell up, and leave everything else where it is.
-
Week 4
Add again where the last set still felt controlled.
Controlled means the final rep of your final set looked like the first: same path, same speed, no swinging or twisting to finish it. Where that’s true, add another small step. Where it isn’t, stay put; the weight will still be there next week.
-
Week 5
Hold the weights, tidy the technique.
No new weight this week. Pick one thing to clean up on each exercise (a deeper leg press, no shrug on the shoulder press, a pause at the top of each leg curl) and use your familiar weights to get it right.
-
Week 6
Last week of the block. One heavier set on each first movement.
The first movements are the leg press, the goblet squat and the hack squat. Our reading of it: do your first two sets as usual, then add a step of weight for the third and do as many of the 12 reps as stay clean, stopping with a rep or two in reserve. Write the number down; it’s where your next block starts.
How to run the plan
Picking your starting weights
Week 1 asks for weights you could do three more reps with. That’s called reps in reserve (RIR): the good reps you still had in you when you stopped, on a scale where 0 means you couldn’t have done another (Zourdos 2016). Three in reserve means finishing rep 12 knowing you could have reached about 15.
Start light and adjust between sets: if rep 12 felt like you could have done 20, go up a step; if you had to fight for it, come down. By the third set you’ll usually be close. Write down where you finished.
Don’t worry about being exact. Across 12 studies, people could do about one more rep than they predicted, beginners and experienced lifters alike, and guesses improved near the end of a set (Halperin 2022). To check yours, once, keep going past 12 on your last set of leg extensions, where a rep you can’t finish just means lowering the pad. If you reach about 15, you guessed right.
When in doubt, go lighter. Going all the way to failure hasn’t been shown to build more muscle (Refalo 2023), and strength gains look similar across a wide range of reps in reserve, though growth may edge up closer to failure (Robinson 2024). Weeks 3, 4 and 6 take you there.
Setting up a machine
Machines usually adjust in a place or two, with a pop pin or a lever, and many have a diagram on the frame showing how to use them. Read it; nobody minds. Before your first rep, check three things.
Seat height. Line the handles or pads up with the part of you the exercise is built around: chest press handles level with the middle of your chest, shoulder press handles at about shoulder height.
The pivot. On machines that swing around an axis, like the leg curl and leg extension, line the joint that moves (your knee) up with the point the machine’s arm rotates around.
Range of motion. Set the start so you get a long, comfortable range: a stretch at one end, a full squeeze at the other, with nothing pinching. Training through a full range has produced more strength and more leg muscle than partial reps (Pallarés 2021).
Then set the weight with the pin, do a few easy reps to check it all feels right, and note your seat settings. Next time, setting up takes seconds.
A five-minute warm-up
Five minutes on a bike, rower or treadmill at a pace you could chat at. Then go to your first exercise and do one or two lighter sets before your working sets: about 10 easy reps at roughly half your working weight, then a few reps a little heavier. Later exercises can usually go straight to working weight, although a light set on a machine you haven’t used before is a good way to check the setup.
Rest between sets
The plan rests 90 seconds between sets of the first three exercises in each session, 60 seconds on the smaller ones after them, and 45 on the plank and the dead bug. Use a timer: 90 seconds feels long when you’re waiting and short when you’re tired.
The research fits the plan well. A meta-analysis found a small benefit to muscle growth from resting longer than 60 seconds, and no clear extra benefit beyond 90 (Singer 2024). If you need a little longer to get your breath back in the first weeks, take it.
Soreness, and when it's pain
Expect some soreness after your first sessions and after any new exercise. That delayed soreness is common after unfamiliar exercise and usually peaks two to three days after the session (Hotfiel 2018). It feels dull and achy, the muscle is tender when you press it and stiff when you first move, and because the plan trains both sides equally you’ll usually feel it on both.
Moving tends to ease it for a while (Cheung 2003), so a walk helps, and your next session can go ahead as planned. If you’re very sore, keep that session’s weights where they were rather than adding more. It usually fades as your muscles adapt: one session of a new exercise protects against much of the damage from the next (McHugh 2003).
Pain is different: sharp or stabbing pain during a rep, pain in a joint rather than a muscle, pain on one side only, or anything that gets worse over a few days instead of better. Stop the exercise that causes it and see a doctor or a physiotherapist.
Gym etiquette
Most of it is common sense, but nobody tells you the specifics.
- Wipe the pads and handles you touched when you’re done. Gyms usually keep spray and paper towels around the floor.
- Put dumbbells back where they came from, and take the plates off the leg press and hack squat when you finish.
- If someone’s waiting, rest beside the machine rather than sitting on it, or offer to let them work in: you take turns, changing the pin each time.
- To use a machine someone’s on, ask how many sets they have left, or whether you can work in. It’s a normal question.
- Leave room around people who are lifting, especially in front of the dumbbell rack, and film only yourself.
When your machine is taken
You have three options. Ask to work in. Do the next exercise in the session and come back. Or use the swap listed under the exercise, which trains the same muscles in a similar way.
Try to keep each session’s first exercise first, since it’s the one the plan wants you freshest for; after that, the order can bend. If you do swap, note it in your log, so next week’s comparison is fair.
How to know it's working
Your notes are the evidence, so write down every weight and rep. On a plan like this, progress looks like:
- The week 1 weights feel easier by week 2 or 3, for the same 12 reps.
- You’ve added weight in weeks 3 and 4 wherever your reps stayed clean.
- Your last rep looks like your first: same path, no swinging, full range.
- The soreness after sessions has mostly gone.
- Setting up takes seconds because you know your seat settings.
Don’t be surprised if the numbers climb quickly at first. Early strength gains come mostly from your nervous system getting better at each movement (Škarabot 2021). Changes in the mirror take longer and vary a lot from person to person, so don’t judge six weeks by them.
After the six weeks
You can run the plan again from week 1, starting from your new weights, which is a perfectly good next six weeks. When you want more, the usual next steps are more sets per muscle, more days, and eventually the barbell lifts. Our Push Pull Legs routine is written for that stage.
Questions beginners ask
How many days a week should a beginner work out?
For strength training, two or three. The World Health Organization recommends muscle-strengthening activities that work all the major muscle groups on two or more days a week (WHO 2020), and the US guidelines also ask for at least two days a week (Physical Activity Guidelines for Americans). Two full body sessions cover that, and a third adds practice and a little more work. The WHO also recommends 150 to 300 minutes a week of moderate-intensity aerobic activity alongside strength work; our zone 2 guide covers the easy end of that.
Is 2 days a week enough?
Yes, for this plan. Twice-weekly training is well supported: in a large network meta-analysis, every resistance training prescription compared, from once a week to three or more times, with heavy or lighter loads, built strength and muscle compared with not training, and for muscle growth the prescriptions performed comparably (Currier 2023). When the total amount of work is the same, spreading it over more days makes little difference to muscle growth (Schoenfeld 2019), though training more often may help strength a little (Pelland 2026).
What you give up on two days is Day C: its extra sets, and the plan’s only calf raises. If you’d like to keep those, our suggestion (not part of the plan) is to add Day C’s 3 × 15 standing calf raises to the end of Day B.
Should beginners do full body workouts?
If you train two or three days a week, full body is the simplest way to train everything more than once a week: each session here works your legs, a push and a pull. On three days, this is a 3 day full body workout for beginners. When the total work is matched, full body and split routines build similar strength and muscle (Ramos-Campo 2024), so the choice is really about your schedule. Splits like upper/lower or push/pull/legs make more sense when you train more days a week.
How many sets should a beginner do?
This plan does 3 sets of every exercise. Counting each exercise toward the muscle it mainly trains, that’s 6 hard sets a week for your chest and 6 for your back on two days (9 each on three), and 9 for the front of your thighs (12 on three). That’s modest on purpose. On average, more weekly sets build more muscle (Schoenfeld 2017), with diminishing returns as you add more (Pelland 2026). But people new to lifting respond to very little: in untrained adults, one set per exercise matched three sets for strength and thigh muscle thickness over 14 weeks (Starkey 1996), and in untrained women, one set matched three for strength and lean muscle over 10 weeks (Cannon & Marino 2010).
Should I be sore after every workout?
No. Soreness is normal in the first week or two and after anything new, and it fades as your muscles adapt (McHugh 2003). It’s also a poor gauge of what a session did: in a study of 110 people, how sore they felt barely tracked other markers of muscle damage (Nosaka 2002). Judge your training by your notes, not by how you feel two days later.
What if I miss a session?
Do the next session on your next training day and carry on. Don’t squeeze two into one day. If you miss a whole week, repeat the last week you finished rather than skipping ahead.
How we made this
This is Beginner Gym Start, one of the 20 plans that ship in Cinder, copied from the app's plan catalogue: every session summary, exercise, set, rep, rest time, note and week focus is verbatim. The session intros, cues, swaps, week notes, practical notes and answers are ours, and where the plan's text is brief, as with week 6's heavier set, we say which part is our reading.
Session times are Cinder's own estimate, computed the way the app computes it: for each exercise, sets multiplied by (reps times 4 seconds plus rest), or by (hold plus rest) for the plank, added up and rounded to the nearest minute. That gives 35, 38 and 31 minutes. It doesn't include a warm-up or time spent setting up machines.
The sample weeks come from running the plan through Cinder's own scheduling code, the part of the app that lays a plan's sessions across the days you pick, for two and three days a week with the week starting on Monday and on Sunday. The messages quoted in the schedule notes are the app's wording.
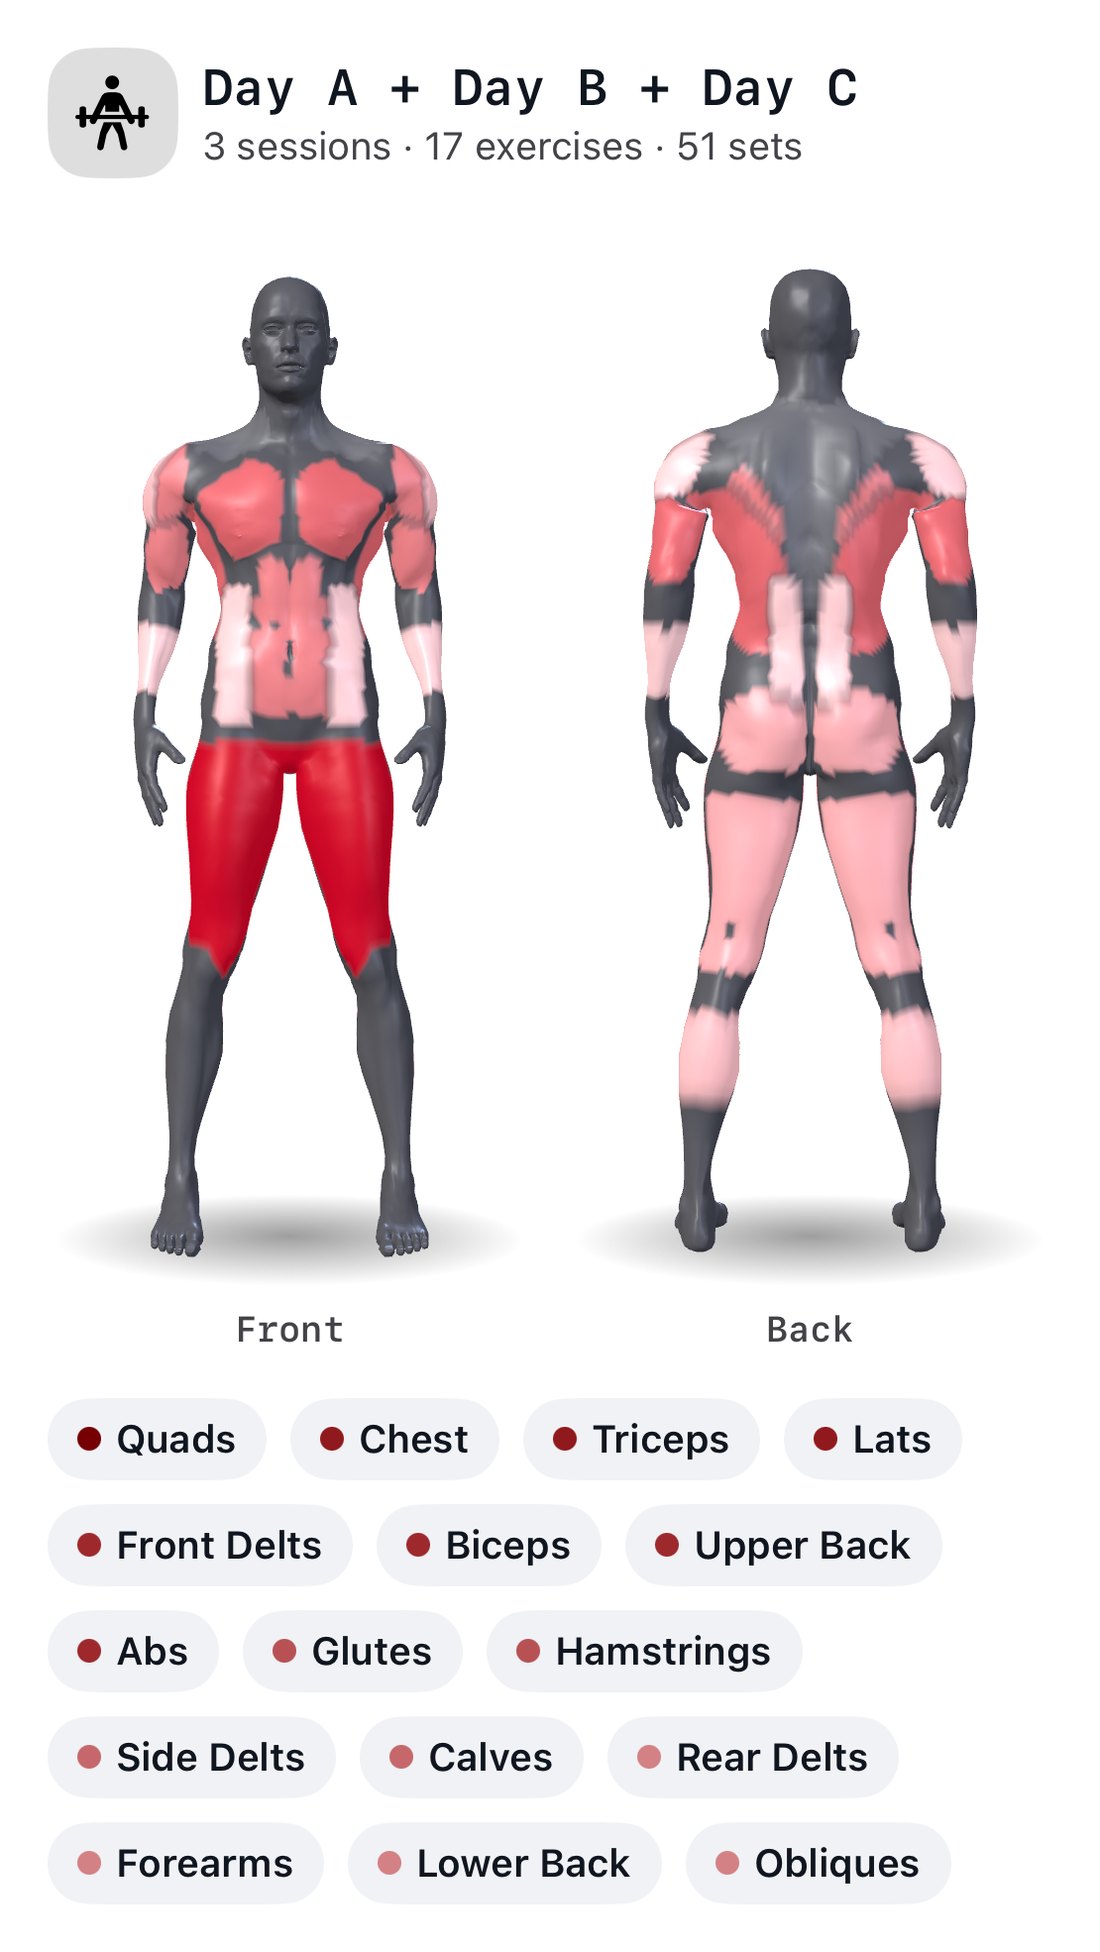
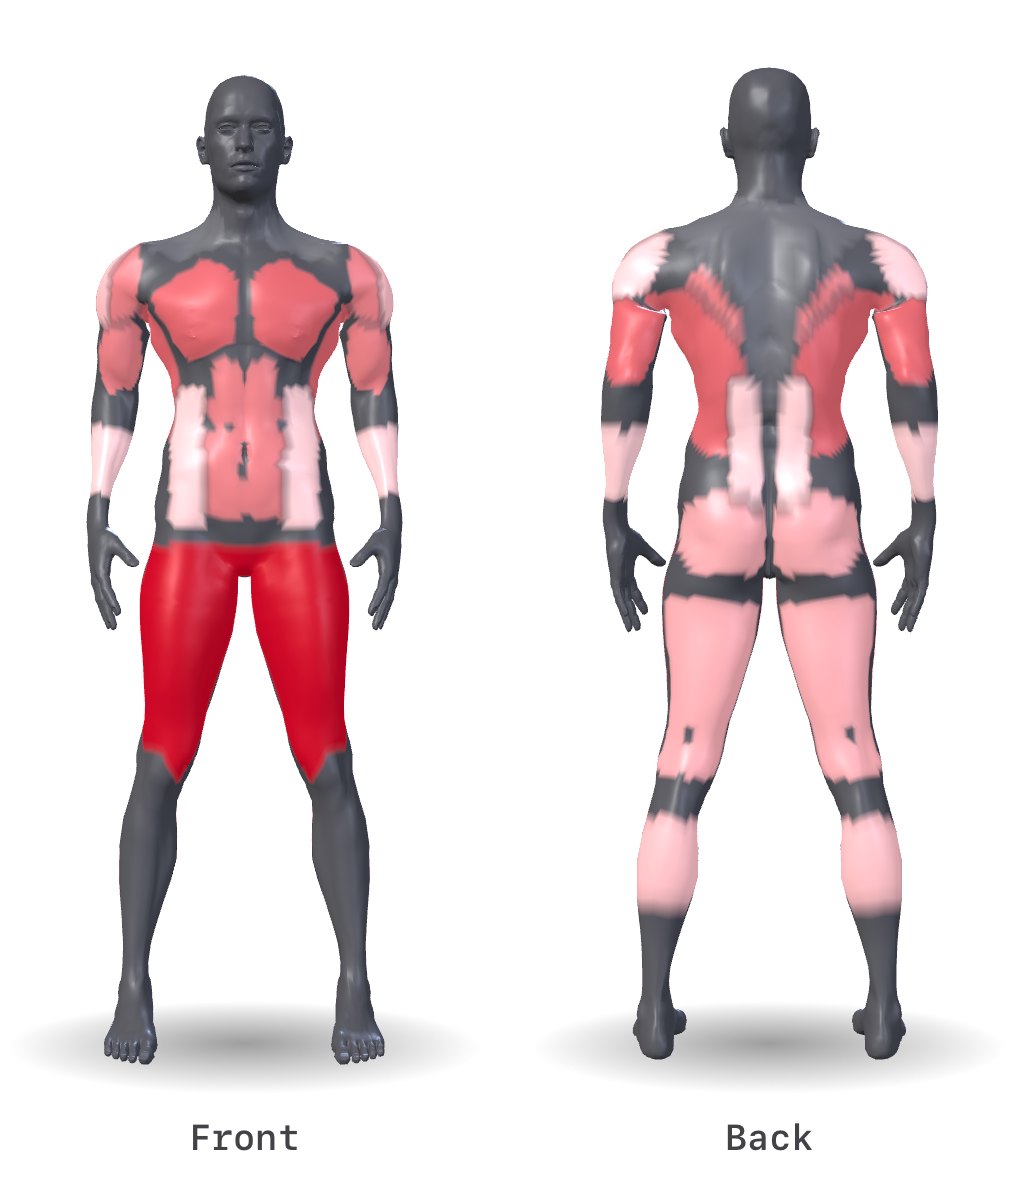
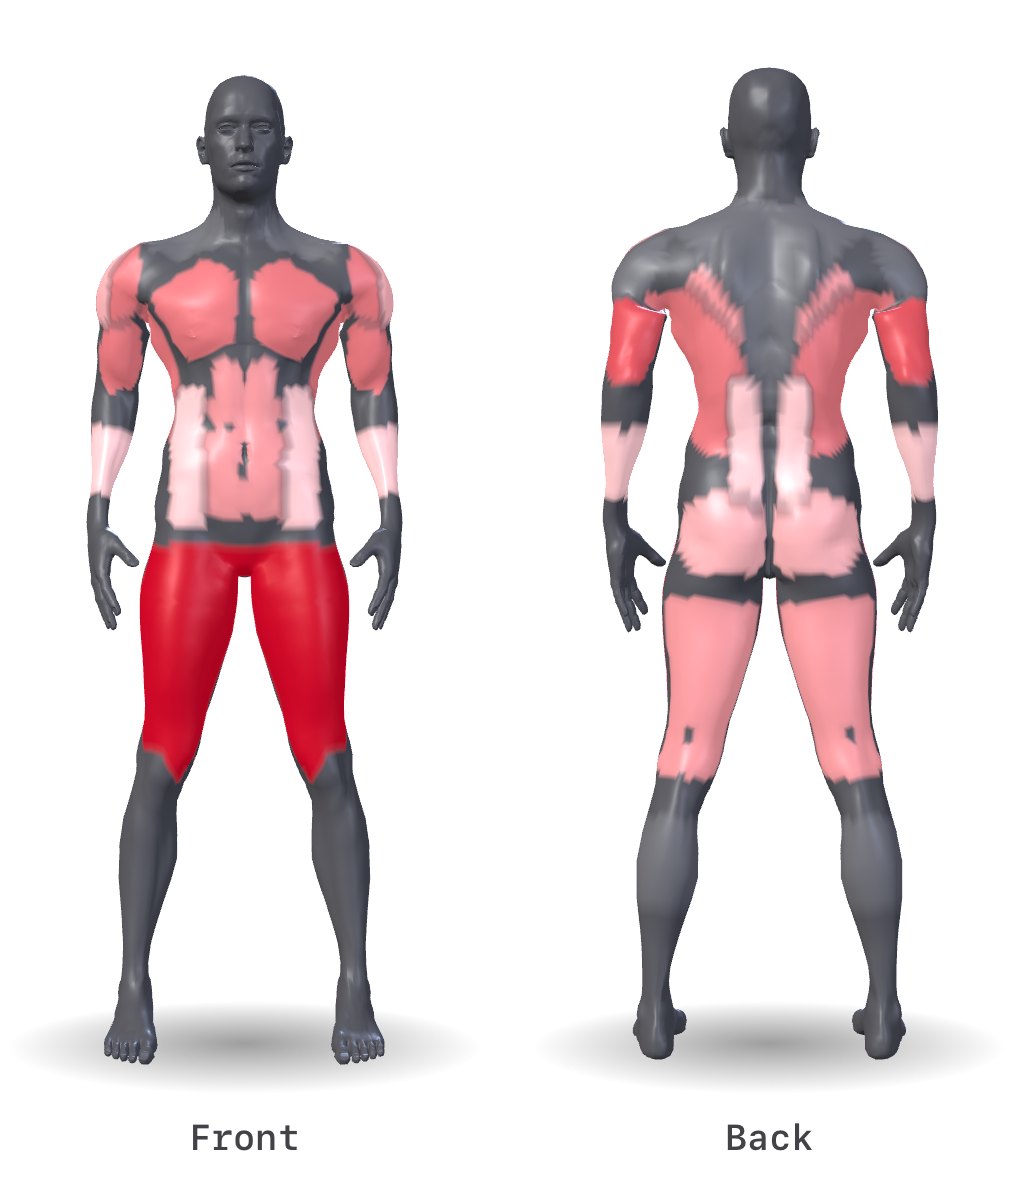
The muscle maps are Cinder's own. We rendered each session in a developer build of the app, with the same 3D muscle map and the same arithmetic it uses after you log a workout: every set counts in full for an exercise's main muscles and half for the muscles that assist, and the shading runs from grey (not worked) to deep red (the session's hardest-worked muscle). The whole-week maps add the sessions together the same way.
The exercise drawings are the ones Cinder shows next to each exercise, by Bryl Lim for Everkinetic (CC BY-SA 4.0), set side by side here in movement order.
Every research claim links to the study or guideline we read, and they're listed under References. The photo comes from Wikimedia Commons and is credited below. Cinder is made by Haplo, which also publishes this blog.
References
- Haugen ME, Vårvik FT, Larsen S, Haugen AS, van den Tillaar R, Bjørnsen T (2023). Effect of free-weight vs. machine-based strength training on maximal strength, hypertrophy and jump performance: a systematic review and meta-analysis. BMC Sports Science, Medicine and Rehabilitation 15:103.
- Bull FC, Al-Ansari SS, Biddle S, et al. (2020). World Health Organization 2020 guidelines on physical activity and sedentary behaviour. British Journal of Sports Medicine 54(24):1451-1462.
- U.S. Department of Health and Human Services (2018). Physical Activity Guidelines for Americans, 2nd edition: top 10 things to know.
- Schoenfeld BJ, Ogborn D, Krieger JW (2017). Dose-response relationship between weekly resistance training volume and increases in muscle mass: a systematic review and meta-analysis. Journal of Sports Sciences 35(11):1073-1082.
- Pelland JC, Remmert JF, Robinson ZP, Hinson SR, Zourdos MC (2026). The resistance training dose response: meta-regressions exploring the effects of weekly volume and frequency on muscle hypertrophy and strength gains. Sports Medicine 56(2):481-505.
- Starkey DB, Pollock ML, Ishida Y, et al. (1996). Effect of resistance training volume on strength and muscle thickness. Medicine & Science in Sports & Exercise 28(10):1311-1320.
- Cannon J, Marino FE (2010). Early-phase neuromuscular adaptations to high- and low-volume resistance training in untrained young and older women. Journal of Sports Sciences 28(14):1505-1514.
- Schoenfeld BJ, Grgic J, Krieger J (2019). How many times per week should a muscle be trained to maximize muscle hypertrophy? A systematic review and meta-analysis of studies examining the effects of resistance training frequency. Journal of Sports Sciences 37(11):1286-1295.
- Currier BS, Mcleod JC, Banfield L, et al. (2023). Resistance training prescription for muscle strength and hypertrophy in healthy adults: a systematic review and Bayesian network meta-analysis. British Journal of Sports Medicine 57(18):1211-1220.
- Ramos-Campo DJ, Benito-Peinado PJ, Andreu-Caravaca L, Rojo-Tirado MA, Rubio-Arias JÁ (2024). Efficacy of split versus full-body resistance training on strength and muscle growth: a systematic review with meta-analysis. Journal of Strength and Conditioning Research 38(7):1330-1340.
- Zourdos MC, Klemp A, Dolan C, et al. (2016). Novel resistance training-specific rating of perceived exertion scale measuring repetitions in reserve. Journal of Strength and Conditioning Research 30(1):267-275.
- Halperin I, Malleron T, Har-Nir I, et al. (2022). Accuracy in predicting repetitions to task failure in resistance exercise: a scoping review and exploratory meta-analysis. Sports Medicine 52(2):377-390.
- Refalo MC, Helms ER, Trexler ET, Hamilton DL, Fyfe JJ (2023). Influence of resistance training proximity-to-failure on skeletal muscle hypertrophy: a systematic review with meta-analysis. Sports Medicine 53(3):649-665.
- Robinson ZP, Pelland JC, Remmert JF, et al. (2024). Exploring the dose-response relationship between estimated resistance training proximity to failure, strength gain, and muscle hypertrophy: a series of meta-regressions. Sports Medicine 54(9):2209-2231.
- Schoenfeld BJ, Ogborn DI, Krieger JW (2015). Effect of repetition duration during resistance training on muscle hypertrophy: a systematic review and meta-analysis. Sports Medicine 45(4):577-585.
- Singer A, Wolf M, Generoso L, et al. (2024). Give it a rest: a systematic review with Bayesian meta-analysis on the effect of inter-set rest interval duration on muscle hypertrophy. Frontiers in Sports and Active Living 6:1429789.
- Pallarés JG, Hernández-Belmonte A, Martínez-Cava A, et al. (2021). Effects of range of motion on resistance training adaptations: a systematic review and meta-analysis. Scandinavian Journal of Medicine & Science in Sports 31(10):1866-1881.
- Rodríguez-Ridao D, Antequera-Vique JA, Martín-Fuentes I, Muyor JM (2020). Effect of five bench inclinations on the electromyographic activity of the pectoralis major, anterior deltoid, and triceps brachii during the bench press exercise. International Journal of Environmental Research and Public Health 17(19):7339.
- Hotfiel T, Freiwald J, Hoppe MW, et al. (2018). Advances in delayed-onset muscle soreness (DOMS): Part I: pathogenesis and diagnostics. Sportverletzung Sportschaden 32(4):243-250.
- Cheung K, Hume P, Maxwell L (2003). Delayed onset muscle soreness: treatment strategies and performance factors. Sports Medicine 33(2):145-164.
- McHugh MP (2003). Recent advances in the understanding of the repeated bout effect: the protective effect against muscle damage from a single bout of eccentric exercise. Scandinavian Journal of Medicine & Science in Sports 13(2):88-97.
- Nosaka K, Newton M, Sacco P (2002). Delayed-onset muscle soreness does not reflect the magnitude of eccentric exercise-induced muscle damage. Scandinavian Journal of Medicine & Science in Sports 12(6):337-346.
- Škarabot J, Brownstein CG, Casolo A, Del Vecchio A, Ansdell P (2021). The knowns and unknowns of neural adaptations to resistance training. European Journal of Applied Physiology 121(3):675-685.
Image credits
- The weight room at the Southside Fitness Center, Ramstein Air Base, Germany · Photo: Senior Airman Elizabeth Baker, U.S. Air Force, Public domain (Cropped to 16:9 and resized)
- Exercise drawings (the same ones Cinder shows) · Drawings: Bryl Lim, from Everkinetic, CC BY-SA 4.0 (rasterized, recolored and traced for Cinder; recolored and set side by side here)